
In this article, you will learn how to Pass Data Between Two ViewController in Xamarin iOS, using Xamarin Studio.
IntroductionXamarin is a platform to develop cross-platform and multi-platform apps (for example, Windows Phone, Android, iOS). In Xamarin platform, the code sharing concept is used. In Xamarin Studio, Visual Studio is also available.


Prerequisites
- Xamarin Studio.
- Xcode.
The steps given below are required to be followed in order to Pass Data Between Two ViewControllers in Xamarin iOS, using Xamarin Studio.
Step 1
Go To Xamarin Studio.
Click New Solution—> select iOS—>select App--> Choose single View App. Afterwards, click Next.

Step 2
In this step, configure your app. Give the app name (Ex: sample), Organization Identifier. Afterwards, click Next.

Step 3
In this step, give your project name (Ex: Sample) and solution name (Ex: Sample). Give the path of your project. Afterwards, click Create.

Step 4
Subsequently, go to the solution. In the solution, get all the files and sources in your project. Now, select Main.storyboard and double-click to open Main.storyboard page.

Step 5
After opening the Main.storyboard, you can design this page, as per your desire.

Step 6
Now, go to the Toolbox Window. In the Toolbox Window, get all the types of the tools and controls. You need to go to the Toolbox Window. Now, scroll down and you will see all the tools and controls. You need to drag and drop the View Controller.and Create a class for SecondViewController.

Step 7
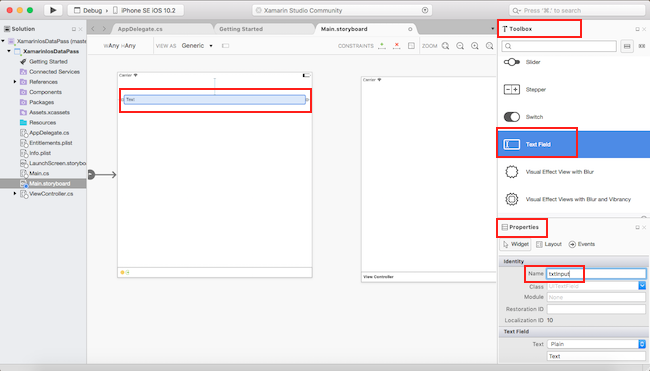
You need to drag and drop the Text Field.
Next, You need to align the Text Field, using constraints.and go to the Properties Window. Select the Text Field and give a name (Ex:txtInput).
Step 8
You need to drag and drop the Button.
Next, You need to align the Button, using constraints.and go to the Properties Window. Select the Button and give a name (Ex:btnSend).

Step 9
You need to drag and drop the Label.in Second ViewController
Next, You need to align the Label, using constraints.and go to the Properties Window. Select the Label and give a name (Ex:lblDisplay).

Step 10
In this step, Show the second view controller. You can click the button (Ctrl +Right Click+ Move) Move the cursor to Second View Controller. If it released, the click shows the list of options and you can choose Show.

Step 11
In this step add one class file. Go to Solution Explorer—>Right Click—>Add—>New File.

Step 12
Now Choose Empty Class file. and give name(Ex:commonclass.cs) to Create New file.

Step 13
In this step, go to the CommonClass.cs page. write the code given below.
CommonClass.cs
using System;

namespace XamarinIosDataPass
{
 public class CommonClass
 {
  public static string value;
 }
}

Step 14
In this step, go to the ViewController.cs page. write the code given below.
ViewController.cs
using System;

using UIKit;

namespace XamarinIosDataPass
{
 public partial class ViewController : UIViewController
 {
  protected ViewController(IntPtr handle) : base(handle)
  {
   // Note: this .ctor should not contain any initialization logic.
  }

  public override void ViewDidLoad()
  {
   base.ViewDidLoad();
   // Perform any additional setup after loading the view, typically from a nib.
  }

  partial void BtnSend_TouchUpInside(UIButton sender)
  {
   CommonClass.value = txtInput.Text;
  }

  public override void DidReceiveMemoryWarning()
  {
   base.DidReceiveMemoryWarning();
   // Release any cached data, images, etc that aren't in use.
  }
 }
}

Step 15
In this step, go to the SecondViewController.cs page. write the code given below.
SecondViewController.cs
using Foundation;
using System;
using UIKit;

namespace XamarinIosDataPass
{
 public partial class SecondViewController : UIViewController
 {
  public SecondViewController(IntPtr handle) : base(handle)
  {
  }
  public override void ViewDidLoad()
  {
   base.ViewDidLoad();

   lblDisplay.Text = CommonClass.value;

  }
 }
}

Step 16
Now, go run option, choose Debug and the list of iPhone and iPad simulators, which are available. You can choose any one simulator and run it.

Output
After a few seconds, the app will start running on your iPhone simulator.You will see your app working successfully.
You can send any data via text field.it will be sent Successfully.
Summary
This was the process of how to Pass Data Between Two ViewController in Xamarin ios, using Xamarin Studio.

No comments:
Post a Comment