Showing posts with label Xamarin Love. Show all posts
Delpin Susai Raj Thursday, 21 February 2019

Xamarin.Forms - Bing Spell Check Using Cognitive Service

In this blog post, you will learn how to Detect and correct spelling mistakes in your app using Cognitive Service Bing Spell Check API in Xamarin forms.

Introduction


Xamarin.Forms code runs on multiple platforms - each of which has its own filesystem. This means that reading and writing files is most easily done using the native file APIs on each platform. Alternatively, embedded resources are a simpler solution to distribute data files with an app.

Cognitive Services

Xamarin and Cognitive Services together can infuse your apps, websites, and bots with intelligent algorithms to see, hear, speak, understand and interpret your user needs through natural methods of communication. Also, they help you transform your business with AI today.

Use AI to solve business problems

  • Vision
  • Speech
  • Knowledge
  • Search
  • Language

Bing Spell Check API
  1. Bing Spell Check API help users correct spelling errors, recognise the difference among names, brand names and slang, as well as understand homophones as they are typing.
  2. Bing Spell Check API has developed a web-based spell-checker.
  3. Bing Spell Check API returns a list of words it does recognize with suggested replacements.


Prerequisites

  • Visual Studio 2017 or Later(Windows or Mac)
  • Bing Spell Check API Key

Setting up a Xamarin.Forms Project

Start by creating a new Xamarin.Forms project. You’ll learn more by going through the steps yourself.
Visual Studio 2019 has more options in the opening window. Clone or check out the code from any repository or, open a project or solution for your computer.
Now, you need to click "Create a new project".

Now, filter by Project Type: Mobile
Choose the Mobile App (Xamarin. forms) project under C# and Mobile.
 Name your app. You probably want your project and solution to use the same name as your app. Put it on your preferred location for projects and click "Create".
 Now, select the blank app and target platforms - Android, iOS and Windows (UWP).

Subsequently, go to the solution. In there, you get all the files and sources of your project (.NET Standard). Now, select XAML page and double-click to open the MainPage.Xaml page.
 You now have a basic Xamarin.Forms app. Click the Play button to try it out.

Get Bing Spell Check API Key

 In this step, get Bing Spell Check API Key. Go to the following link.
https://azure.microsoft.com/en-in/services/cognitive-services/

Click "Try Cognitive Services for free".


Now, you can choose Bing Spell Check API under Language APIs. Afterward, click "Get API Key".

Now, the API key is activated. You can use it now.
Note
The trial key is available only for 7 days.

Setting up the User Interface

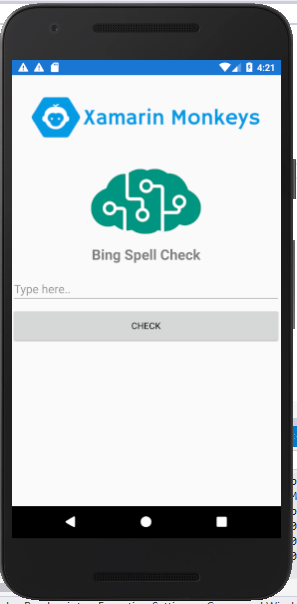
Go to MainPage.Xaml and write the following code.
MainPage.xaml


Click the play button to try it out.
NuGet Packages
Now, add the following NuGet Packages.
  • Newtonsoft.Json
Add Newtonsoft.Json NuGet
Go to Solution Explorer and select your solution. Right-click and select "Manage NuGet Packages for Solution". Search "Newtonsoft.Json" and add Package. Remember to install it(.NET Standard).

Create a Model
In this step, you can create a model for Deserializing your response.
ResponseModel.cs


Bing Spell Check.
In this step, write the following code for Bing Spell Check.
Note:
Try out the spell check capabilities with Bing Spell Search API v7.

  • ‘Spell’ is more aggressive in order to return better search results,
  • ‘Proof’ is less aggressive and adds capitalisation, basic punctuation and other features to aid document creation.
MainPage.xaml.cs


Click the Play button to try it out.

I hope you have understood how to Detect and correct spelling mistakes in your app using Cognitive Service Bing Spell Check API in Xamarin.Forms.

More Sample from Github 

Thanks for reading. Please share comments and feedback. Happy Coding :)

Delpin Susai Raj Friday, 10 November 2017

Rating Bar in Xamarin iOS

In this article, you will learn how to Create a Rating Bar in Xamarin iOS, using Xamarin Studio.

Introduction

Xamarin is a platform to develop cross-platform and multi-platform apps (for example, Windows phone, Android, iOS). In Xamarin platform, the code sharing concept is used. In Xamarin Studio, Visual Studio is also available.

Browse Code Here


Prerequisites


  • Xamarin Studio.
  • Xcode.


The steps given below are required to be followed in order to Create a Rating Bar in Xamarin iOS, using Xamarin Studio.

Step 1

Go To Xamarin Studio.

Click New Solution—> select iOS—>select App--> Choose single View App. Afterwards, click Next.


Step 2

In this step, configure your app. Give the app name (Ex:sample), Organization Identifier. Afterwards, click Next.


Step 3

In this step, give your project name (Ex: Sample) and solution name (Ex: Sample). Give the path of your project. Afterwards, click Create.


Step 4

Subsequently, go to the solution. In the solution, get all the files and sources in your project. Now, select Main.storyboard and double click to open Main.storyboard page.
After opening the Main.storyboard, you can design this page, as per your desire.


Step 5

After opening the Main.storyboard, you can design this page, as per your desire.


Step 6

In this step, add the Images form your Local system.

Go to Solution—>Resource-->Right click-->Add-->Add Files.Now, you can choose the required Images. Click open.

Next, choose Copy the Files to the directory. Afterwards, click Ok.


Step 7

In this step design your app.using storyboard, Toolbox and Properties


  1. Button(btn1)
  2. Button(btn2)
  3. Button(btn3)
  4. Button(btn4)
  5. Button(btn5)
  6. Label(lblRate)


Step 8


In this step, go to the ViewController.cs page. write the code given below.

ViewController.cs

using System;

using UIKit;

namespace XamariniOSRatingBar
{
 public partial class ViewController : UIViewController
 {
  protected ViewController(IntPtr handle) : base(handle)
  {
   // Note: this .ctor should not contain any initialization logic.
  }

  public override void ViewDidLoad()
  {
   base.ViewDidLoad();


   btn1.SetBackgroundImage(UIImage.FromFile("gray-star.png"), UIControlState.Normal);
   btn2.SetBackgroundImage(UIImage.FromFile("gray-star.png"), UIControlState.Normal);
   btn3.SetBackgroundImage(UIImage.FromFile("gray-star.png"), UIControlState.Normal);
   btn4.SetBackgroundImage(UIImage.FromFile("gray-star.png"), UIControlState.Normal);
   btn5.SetBackgroundImage(UIImage.FromFile("gray-star.png"), UIControlState.Normal);

   lblRating.Text = "Your Rating:0/5";

  }

  partial void UIButton17_TouchUpInside(UIButton sender)
  {
   btn1.SetBackgroundImage(UIImage.FromFile("yellow-star.png"), UIControlState.Normal);
   btn2.SetBackgroundImage(UIImage.FromFile("yellow-star.png"), UIControlState.Normal);
   btn3.SetBackgroundImage(UIImage.FromFile("yellow-star.png"), UIControlState.Normal);
   btn4.SetBackgroundImage(UIImage.FromFile("yellow-star.png"), UIControlState.Normal);
   btn5.SetBackgroundImage(UIImage.FromFile("yellow-star.png"), UIControlState.Normal);


   lblRating.Text = "Your Rating:5/5";
  }

  partial void UIButton16_TouchUpInside(UIButton sender)
  {
   btn1.SetBackgroundImage(UIImage.FromFile("yellow-star.png"), UIControlState.Normal);
   btn2.SetBackgroundImage(UIImage.FromFile("yellow-star.png"), UIControlState.Normal);
   btn3.SetBackgroundImage(UIImage.FromFile("yellow-star.png"), UIControlState.Normal);
   btn4.SetBackgroundImage(UIImage.FromFile("yellow-star.png"), UIControlState.Normal);


   btn5.SetBackgroundImage(UIImage.FromFile("gray-star.png"), UIControlState.Normal);

   lblRating.Text = "Your Rating:4/5";
  }

  partial void UIButton15_TouchUpInside(UIButton sender)
  {

   btn1.SetBackgroundImage(UIImage.FromFile("yellow-star.png"), UIControlState.Normal);
   btn2.SetBackgroundImage(UIImage.FromFile("yellow-star.png"), UIControlState.Normal);
   btn3.SetBackgroundImage(UIImage.FromFile("yellow-star.png"), UIControlState.Normal);


   btn4.SetBackgroundImage(UIImage.FromFile("gray-star.png"), UIControlState.Normal);
   btn5.SetBackgroundImage(UIImage.FromFile("gray-star.png"), UIControlState.Normal);

   lblRating.Text = "Your Rating:3/5";
  }

  partial void UIButton14_TouchUpInside(UIButton sender)
  {
   btn1.SetBackgroundImage(UIImage.FromFile("yellow-star.png"), UIControlState.Normal);
   btn2.SetBackgroundImage(UIImage.FromFile("yellow-star.png"), UIControlState.Normal);


   btn3.SetBackgroundImage(UIImage.FromFile("gray-star.png"), UIControlState.Normal);
   btn4.SetBackgroundImage(UIImage.FromFile("gray-star.png"), UIControlState.Normal);
   btn5.SetBackgroundImage(UIImage.FromFile("gray-star.png"), UIControlState.Normal);

   lblRating.Text = "Your Rating:2/5";
  }

  partial void UIButton13_TouchUpInside(UIButton sender)
  {
   btn1.SetBackgroundImage(UIImage.FromFile("yellow-star.png"), UIControlState.Normal);

   btn2.SetBackgroundImage(UIImage.FromFile("gray-star.png"), UIControlState.Normal);
   btn3.SetBackgroundImage(UIImage.FromFile("gray-star.png"), UIControlState.Normal);
   btn4.SetBackgroundImage(UIImage.FromFile("gray-star.png"), UIControlState.Normal);
   btn5.SetBackgroundImage(UIImage.FromFile("gray-star.png"), UIControlState.Normal);

   lblRating.Text = "Your Rating:1/5";
  }

  public override void DidReceiveMemoryWarning()
  {
   base.DidReceiveMemoryWarning();
   // Release any cached data, images, etc that aren't in use.
  }
 }
}


Step 9

Now, go to Run option , choose Debug and the list of iPhone and iPad simulators, which are available. You can choose any one simulator and run it.


Output

After a few seconds, the app will start running on your iPhone simulator.You will see your app working successfully.


You can see the Rating bar is Working Successfully.

Summary

This was the process of how to Create a Rating Bar in Xamarin iOS , using Xamarin Studio.

Please Share Your Comments and Feedback.

Delpin Susai Raj Tuesday, 3 October 2017

Display An Alert Dialog in Xamarin.Forms

In this article, you will learn how to Display An Alert Dialog in Xamarin.Forms, using Visual Studio.

Introduction

Xamarin is a platform to develop cross-platform and multi-platform apps (for example, Windows Phone, Android, iOS). In Xamarin platform, the code sharing concept is used. In Xamarin Studio, Visual Studio is also available.


Prerequisites
  • Visual Studio 2017.

The steps given below are required to be followed in order to Display An Alert Dialog in Xamarin.Forms, using Visual Studio.

Step 1

Click File--> select New--> select Project. The project needs to be clicked after opening all the types of the projects in Visual Studio or click (Ctrl+Shift+N).


Step 2

After opening the New Project, select Installed-->Templates-->Visual C#-->Cross-Platform-->choose Cross-Platform App. Now, give your Xamarin from app name (Ex: sample) and give the path of your project. Afterwards, click OK.


Step 3

Now, choose Blank App and select forms PCL(sharing). Afterwards, click OK.


Step 4

Now, go to Solution Explorer. In Solution Explorer, get all the files and source in your project. You can add Universal Windows Platform (UWP). In Reference, go to Solution Explorer-->Your Project-->UWP-->Reference-->Right Click --> Select Add reference.


Step 5

Now, you can select Universal Windows and select Extensions.Check.

  • Windows Desktop Extension for the UWP. version:10.0.1439
  • Windows Desktop Extension for the UWP. version:10.0.1058

Afterwards, click OK.


Step 6

In this step, add one Page, whose name is called MainPage.xaml. Go to Solution Explorer-->Your Project-->Portable-->Right click-->Add-->New Item (Ctrl+Shift+A).


Step 7

Now, select Forms XAML page and give the name (MainPage.xaml).


Step 8

In this step, go to the MainPage.xaml page and write the code given below.

MainPage.xaml


Step 9

In this step, go to the MainPage.xaml.cs page. Create Button_OnClicked method and write the code given below.

MainPage.xaml.cs


Step 10

In this step, go to App.cs page. Write the code, mentioned below between Public App() Method.

App.cs


Step 11

Now, you can run your app. Go to the Debug configuration Manager. Choose platform and check build and deploy option. Afterwards, click close.


Step 12

If you have Windows 10 Emulator, you can run it. If you don't have it, simply run Local Machine.


Output

After few seconds, the app will start running on your Windows 10 Emulator.You will see your app is work Successfully. Now you can click, Click Button.


You Will see the Alert Dialog Work Successfully.

Summary

This was the process of how to Display An Alert Dialog in Xamarin.Forms, using Visual Studio.

Please share your comments.
Delpin Susai Raj Wednesday, 27 September 2017

What's New in Visual Studio 2017

Description

                 Visual Studio is a productivity game changer for C#! The .NET Compiler Platform ("Roslyn") enables many new experiences that will change the way you write and debug code. In this session, we'll dig into features that bring a new level of awesome to the C# language and IDE experience. Come learn about new language features, refactoring support, major debugging enhancements, code-aware frameworks, and much more!

More information, check out this course on Microsoft Virtual Academy


Download Slides Here