Showing posts with label Xamarin. Show all posts
Delpin Susai Raj Wednesday, 27 October 2021

Xamarin.Forms - Validation using Fluent Validation in MVVM

In this blog post, you will learn how to use fluent validation in MVVM in Xamarin.Forms App

Introduction

Xamarin.Forms code runs on multiple platforms - each of which has its own filesystem. This means that reading and writing files is most easily done using the native file APIs on each platform. Alternatively, embedded resources are a simpler solution to distribute data files with an app.

Fluent Validation

Fluent Validation is one of the best Libraries for Xamarin.Forms it's used to validate XAML Controls. Fluent Validation is used to create the validation logic separate from business logic. Fluent validation is used to lambda expressions for building validation rules for your business objects.

References

https://github.com/james-russo/XamarinForms-UnobtrusiveValidationPlugin

Prerequisites

  • Visual Studio 2017 or later (Windows or Mac)

Let's Start

Setting up a Xamarin.Forms Project

Start by creating a new Xamarin.Forms project. You will learn more by going through the steps yourself. 

Create a new or existing Xamarin forms(.Net standard) Project. With Android and iOS Platform. 

Setup UI

Now, Create a UI for your requirement. I just created a simple login page for validation purposes.

LoginPage.xaml

LoginPageViewModel

Here, you can write your business logic for your requirement. I just add simple login validation only. LoginCommand will validate the login form.

LoginPageViewModel.cs

Install Fluent Validation NuGet

Install the following Nuget from Nuget Package Manager In your Visual Studio.

Fluent Validation

Create Fluent Validator

Now, Create a validator class in .Net Standard or PCL Library for your ViewModel or your business logic. I create LoginValidator for my LoginPageViewModel.

LoginValidation.cs

Here I just added the NotNull check validation with the failure message. You can explore more features for the Fluent validation

https://github.com/james-russo/XamarinForms-UnobtrusiveValidationPlugin

Result

The below image for login validation failed.

The Login validation is Success

Conclusion

I hope you have understood how to validate objects using fluent validation in MVVM in Xamarin.Forms App

Thanks for reading. Please share your comments and feedback. Happy Coding :)

Delpin Susai Raj Wednesday, 9 June 2021

Xamarin.Forms - Working with UI Tests

 In this blog, you will learn how to test Xamairn UI controls in Xamarin.Forms.

Introduction

Xamarin.Forms code runs on multiple platforms - each of which has its own filesystem. This means that reading and writing files is most easily done using the native file APIs on each platform. Alternatively, embedded resources are a simpler solution to distribute data files with an app.

Xamarin.UITest

Xamarin.UITest is a C# testing framework using NUnit for UI Acceptance Tests on iOS and Android apps. It integrates tightly with Xamarin.iOS and Xamarin.Android projects, Xamarin.UITest is the Automation Library that allows the NUnit tests to execute on Android and iOS devices. The tests interact with the user interface as a user would: entering text, tapping buttons, and gestures - such as swipes.

Like Appium and Robot Framework, Xamarin.UITest is among the best open-source, cross-platform UI testing frameworks. It’s a more straightforward choice when it comes to automating Android and iOS apps built with Xamarin.Forms. 

Follow the Arrange-Act-Assert pattern:

  • Arrange: The test will set up conditions and initialize things so that the test can be actioned.
  • Act: The test will interact with the application, enter text, pushing buttons, and so on.
  • Assert: The test examines the results of the actions run in the Act step to determine correctness. For example, the application may verify that a particular error message is displayed.

Prerequisites

  • Visual Studio 2017 or later (Windows or Mac)

Setting up a Xamarin.Forms Project

 Start by creating a new Xamarin.Forms project. You wíll learn more by going through the steps yourself.

 Create a new or existing Xamarin forms(.Net standard) Project. With Android and iOS Platform. 

Add UI Test Project

Now, Add the UI Test project to your existing Xamarin.forms project. Go to your solution add a new project select Xamarin UI Project refer to the following screenshot.

Name your UI Test project the click to add.

Use AutomationId

  1. AutomationId should be added to all UI controls that are required for UI testing.
  2. AutomationId is a Dependency Property which can also be set with a binding expression.
  3. InvalidOperationException will be thrown if an attempt is made to set the AutomationId property of an Element more than once.
  4. AutomationId and X:Name are different. You must set AutomationId for all controls.

Ex: AutomationId="EntryPhoneNumber"

Create a UI

Here, I'm going to create a simple UI for UI Testing.

MainPage.XAML

Configure App

Here, you need to configure both iOS and Android App paths see below code.

AppInitializer.cs

 Android

You can specify your APK path. Go to your Android project debug/bin folder you can find the com.companyname.xamarinapp.apk file you copy the file path and set the ApkFile.

The device can be specified using the DeviceSerial method:

iOS

Specify the iOS IPA path. Go to your iOS debug/bin folder you can find the AppName.iOS file you copy the file path and set the AppBundle.


iOS Enable Test Cloud

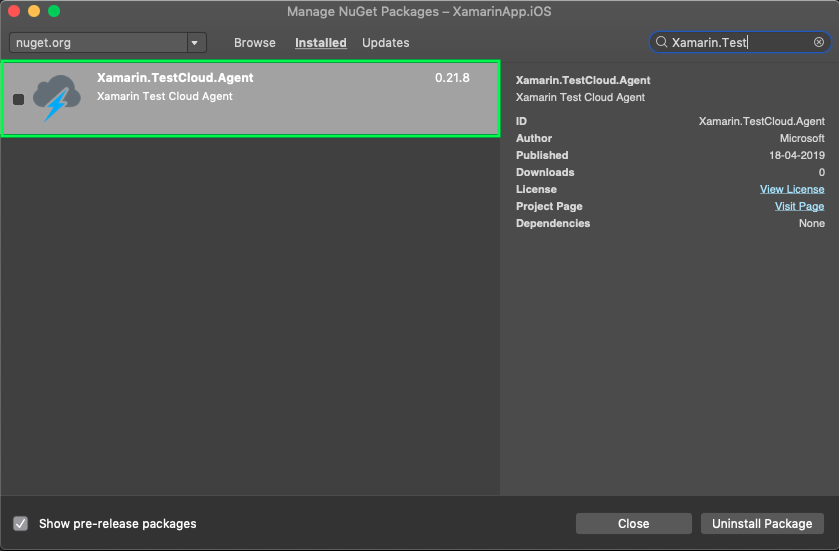
To run tests on iOS, the Xamarin Test Cloud Agent NuGet package must be added to the project. Once it's been added, Add the following code into the AppDelegate.FinishedLaunching method:

Xamarin Test Cloud Agent NuGet package

AppDelegate

Set Compiler Variable

Set compiler variable to your iOS app. Go to the project option in the Compiler section set define symbols. "ENABLE_TEST_CLOUD" refer below screenshot.

Write UI Test

Now, I'm going to write the Automation UI Test for PhoneNumber validation. See below code

Run

The test method has been passed.

Download full source from Github

References

https://docs.microsoft.com/en-us/appcenter/test-cloud/frameworks/uitest/

I hope you have understood you will learn how to test Xamarin UI Elements Xamarin.Forms.

Thanks for reading. Please share your comments and feedback. 

Happy Coding :)

Delpin Susai Raj Wednesday, 10 March 2021

Xamarin.Forms - How to sent Firebase Push notification(FCM) in postman

In this blog, you will learn how to sent FCM push notification in Xamarin.Forms app

Many developers facing the problem how to test the custom push notification without api this blog will helps you.

Register token

Register Notification service in your xamarin.iOS and Xamarin.Andorid apps and get push notification token.

Set POST Method

Url

Sent your notification to following address

https://fcm.googleapis.com/fcm/send

Headers

Add below headers in postman for FCM

Content-Type : application/json 

Authorization:key= ******your server key from firebase console****


Get your Server key

https://console.firebase.google.com/

Go to firebase console with your credentials then go to your app setting you can see the could messaging section see below image

Body

Sent your notification as JSON format

Body->Raw->JSON

Sent iOS

Below json format for iOS

Sent Android

Add below json for Android push notification format

I hope you have understood you will learn how to sent FCM push notification in Xamarin.Form app

Thanks for reading. Please share your comments and feedback. 

Happy Coding :)

Delpin Susai Raj Monday, 7 December 2020

Xamarin.Forms - Open App Store or Play Store in XamarinApp

 In this blog post, you will learn how to Open Play Store or App Store in XamarinApp.

Introduction

Xamarin.Forms code runs on multiple platforms - each of which has its own filesystem. This means that reading and writing files is most easily done using the native file APIs on each platform. Alternatively, embedded resources are a simpler solution to distribute data files with an app.

Prerequisites

  • Visual Studio 2017 or later (Windows or Mac)

Setting up a Xamarin.Forms Project

Start by creating a new Xamarin.Forms project. You wíll learn more by going through the steps yourself.

Create a new or existing Xamarin forms(.Net standard) Project. With Android and iOS Platform. 

Note: Your app must be live in App store and Playstore 

Android

Here, you need the Android app id Ex:com.twitter.android.

I'm using twitter for this sample.

https://play.google.com/store/apps/details?id=com.twitter.android

Code

iOS

Here, you need AppName and AppId with location you will get appname and aped from apple developer connect.

https://apps.apple.com/in/app/twitter/id333903271

Code

Simple UI

MainPage.xaml

Full Source Code

MainPage.xaml.cs

Alternate way

You can use Lancher.OpenAsync also for opening App Store and Play store.

Using Dependency Service

Interface

iOS Implementation

Below sample code for open App store in App iOS.

Android Implementation

Below sample code for open play store in App android. 

Debug your App

I hope you have understood you will learn how to Open Play Store or App Store in XamarinApp.

Thanks for reading. Please share your comments and feedback. Happy Coding :)

Delpin Susai Raj Friday, 19 June 2020

Xamarin.Forms - Enable Default Zooming in Webview

In this blog post, you will learn how to enable webview default zooming in xamarin forms.

Introduction
 
Xamarin.Forms code runs on multiple platforms, each of which has its own filesystem. This means that reading and writing files are most easily done using the native file APIs on each platform. Alternatively, embedded resources are a simpler solution to distribute data files with an app.

Prerequisites
  • Visual Studio 2017 or later (Windows or Mac)
Setting up a Xamarin.Forms Project
 
Start by creating a new Xamarin.Forms project. You will learn more by going through the steps yourself.
 
Create a new or existing Xamarin forms (.Net standard) Project with Android and iOS Platform.

Choose the Mobile App (Xamarin. forms) project under C# and Mobile.
 
Name your app. You probably want your project and solution to use the same name as your app. Put it on your preferred location for projects and click "Create".
 
Now, select the blank app and target platforms - Android, iOS, and Windows (UWP).
 
Subsequently, go to the solution. In there, you get all the files and sources of your project (.NET Standard). Now, select the XAML page and double-click to open the MainPage.Xaml page.
 
You now have a basic Xamarin.Forms app. Click the Play button to try it out.

Create a Custom Webview

Here going to create a custom webview inherit from webview for custom rendering to enable zooming.

CustomWebView.cs


Android Implementation
 
There are two ways in android.

1. Use Platform Specific code.

Following code snippets enable the default zooming in webview.

MyWebView.xaml.cs


2. Custom Renderer

Here, Create a custom renderer for enabling zooming in android.

CustomWebViewRenderer.cs


iOS Implementation
 
Here, Create a custom renderer for enabling the webview default zooming in iOS.
 
CustomWebViewRenderer.cs


Consuming the CustomWebview
 
Here, consume the Custom Webview in your xaml

Add Namespace


Add your Custom Webview

MyWebPage.xaml


MyWebPage.xaml.cs


Click the "Play" button to try it out

Android 
You can test zoom by emulator also use Shift + ctrl + Left click and mouse move

iOS 
Simulator also support zoom use Alt + Left click and mouse move

Wow, It's working.😍
 
I hope you have understood how to enable webview default zooming in Xamarin.Forms.
 
Thanks for reading. Please share your comments and feedback.

Happy Coding 🙌
Delpin Susai Raj Wednesday, 15 January 2020

Xamarin.Forms - Getting started with Prism

In this blog post, you will learn how to use Prism in existing Xamarin.Forms app.

Introduction

Xamarin.Forms code runs on multiple platforms - each of which has its own filesystem. This means that reading and writing files are most easily done using the native file APIs on each platform. Alternatively, embedded resources are a simpler solution to distribute data files with an app.

MVVM

MVVM - Model View ViewModel
MVVM Is the design pattern to separate the user interface & business logic concerns. I suppose that you heard something about it. This pattern created by Microsoft is widely used with applications created with .NET Framework but not only because you can also use it with Xamarin.

Prism
Prism is a framework for building loosely coupled, maintainable, and testable XAML applications in WPF, Windows 10 UWP, and Xamarin Forms. Prism provides an implementation of a collection of design patterns that are helpful in writing well-structured and maintainable XAML applications, including MVVM, dependency injection, commands, EventAggregator, and others.

Prism Containers
  1. Unity
  2. DryIoc
Unity is the container I use and recommend the most. Unity is the most popular container due to it being the container that Brian has used for years and it is the first (and for a long time only) container available in the Templates. Unity is also about average with regards to its benchmark performance.

DryIoc is the container It's under active development, it's very fast, and works well with the current release of Prism. Also important is that when I have had questions or issues the maintainer has been very quick to address the issue or answer the question I had. It's for all of these reasons I continue to recommend the container.

Go with Prism Unity Container

Prerequisites
  • Visual Studio 2017 or later (Windows or Mac)
Setting up a Xamarin.Forms Project

Start by creating a new Xamarin.Forms project. You wíll learn more by going through the steps yourself.

Create a new or existing Xamarin forms(.Net standard) Project. With Android and iOS Platform.

Install "Prism.Unity.Forms" Nuget

Now, add the following NuGet Packages.
  • Prism.Unity.Forms
Go to Solution Explorer and select your solution. Right-click and select "Manage NuGet Packages for Solution". Search "Prism.Unity.Forms" and add Package. Remember to install it for each project (.NET Standard, Android, iO, and UWP).

Change Application to PrismApplication

After install Prism.Unity.Prism, Change Application to PrismApplication in App.Xaml

App.xaml

Register NavigationService

Change Application to PrismApplication and add IPlatformInitializer to App Constructor.
Then register your content page and ViewModel using IContainerRegistry
  1. override OnInitialized (Initialize Components)
  2. override  RegisterTypes (Navigation Service Register)
Refer following code snippet.

App.xaml.cs

Platform Setup

Android

Need to change IPlatformInitializer in LoadApplication.

MainActivity.cs

iOS

Need to change IPlatformInitializer in LoadApplication.

AppDelegate.cs

MVVM BindingContext

You no need to set BindingContext your ViewModel to ContentPage. Just create a ContentPage name ending with Page. (Ex: MyPage). Create a ViewModel name staring with ContentPage Name (ex: MyPageViewModel).

ViewModelLocator

If Viewmodel BindingContext is not working. Follow the below step.

ContentPage.xaml.cs

ContentPage.Xaml

Click the "Play" button to try it out.

Wow, it's working. 😍

I hope you have understood how to how to use Prism in existing Xamarin.Forms app.

Thanks for reading. Please share your comments and feedback. Happy Coding :)
Delpin Susai Raj Tuesday, 23 July 2019

Xamarin.Forms - Bottom Tabbed Page using Shell

In this blog post, you will learn how to create a Tabbedpage and sub tabs using shell in Xamarin.Forms.


Introduction

Xamarin.Forms code runs on multiple platforms - each of which has its own filesystem. This means that reading and writing files is most easily done using the native file APIs on each platform. Alternatively, embedded resources are a simpler solution to distribute data files with an app.

Shell

Xamarin.Forms Shell reduces the complexity of mobile application development by providing the fundamental features that most mobile applications require. This includes a common navigation user experience, a URI-based navigation scheme, and an integrated search handler.

Prerequisites

  • Visual Studio 2019 (Windows or Mac)
  • Xamarin.Forms 4.0 Updated

Setting up a Xamarin.Forms Project

Start by creating a new Xamarin.Forms project. You wíll learn more by going through the steps yourself.

Visual Studio 2019 has more options in the opening window. Clone or check out the code from any repository or, open a project or solution for your computer.

Now, you need to click "Create a new project".

Now, filter by Project Type: Mobile

Choose the Mobile App (Xamarin. forms) project under C# and Mobile.

Name your app. You probably want your project and solution to use the same name as your app. Put it on your preferred location for projects and click "Create".

Now, select the blank app and target platforms - Android, iOS and Windows (UWP).

Subsequently, go to the solution. In there, you get all the files and sources of your project (.NET Standard). Now, select the XAML page and double-click to open the MainPage.Xaml page.

You now have a basic Xamarin.Forms app. Click the Play button to try it out.

Note : Your Xamarin.forms version should be updated 4.0

Bottom Tabbed Page

This code example is Bottom Tabbed Page

Method #1

AppShell.Xaml


Method #2

AppShell.Xaml


Method #3

AppShell.xaml


Try it out.

Sub Tab view

AppShell.xaml

This code example is Sub Tabbed Page


Click the "Play" button to try it out.

I hope you have understood how to create a Tabbedpage and sub tabs using shell in Xamarin.Forms..

Thanks for reading. Please share your comments and feedback. Happy Coding :)
Delpin Susai Raj Wednesday, 12 June 2019

Xamarin.Forms - Change Entry Return Button

In this blog post, you will learn how to change entry return button in Xamarin.Forms.


Introduction

Xamarin.Forms code runs on multiple platforms - each of which has its own filesystem. This means that reading and writing files is most easily done using the native file APIs on each platform. Alternatively, embedded resources are a simpler solution to distribute data files with an app.

Custom Renderers

Xamarin.Forms user interfaces are rendered using the native controls of the target platform, allowing Xamarin.Forms applications to retain the appropriate look and feel for each platform. Custom Renderers let developers override this process to customize the appearance and behaviour of Xamarin.Forms controls on each platform.

Prerequisites
  • Visual Studio 2017 or later (Windows or Mac)
Setting up a Xamarin.Forms Project

Start by creating a new Xamarin.Forms project. You wíll learn more by going through the steps yourself.

Visual Studio 2019 has more options in the opening window. Clone or check out the code from any repository or, open a project or solution for your computer.

Now, you need to click "Create a new project".
Now, filter by Project Type: Mobile

Choose the Mobile App (Xamarin. forms) project under C# and Mobile.

Name your app. You probably want your project and solution to use the same name as your app. Put it on your preferred location for projects and click "Create".

Now, select the blank app and target platforms - Android, iOS and Windows (UWP).

Subsequently, go to the solution. In there, you get all the files and sources of your project (.NET Standard). Now, select the XAML page and double-click to open the MainPage.Xaml page.

You now have a basic Xamarin.Forms app. Click the Play button to try it out.

Create a Custom Entry

Now, create an Inherit class form Entry for Customising the Entry control.

Now, write the following code.

CustomEntry.cs

Android Implementation

In this step, create an inherit Class form, EntryRenderer for customizing the Entry control.

Now, write the code given below.

CustomEntryRenderer.cs

iOS Implementation

In this step, create an inherit Class form, EntryRenderer for customizing the Entry control.

Now, write the code given below.

CustomEntryRenderer.cs

Setting up the User Interface

Go to MainPage.Xaml and write the following code.

MainPage.xaml


Click the "Play" button to try it out.
I hope you have understood how to change entry return button in Xamarin.Forms..

Thanks for reading. Please share your comments and feedback. Happy Coding :)
Delpin Susai Raj Wednesday, 23 January 2019

Xamarin.Forms - Working with Firebase Realtime Database CRUD Operations

In this blog post, you will learn how to use Firebase Realtime Database with CRUD Operations in Xamarin.Forms.


Introduction


Xamarin.Forms code runs on multiple platforms - each of which has its own filesystem. This means that reading and writing files is most easily done using the native file APIs on each platform. Alternatively, embedded resources are a simpler solution to distribute data files with an app.

Firebase

Firebase gives you functionality like analytics, databases, messaging and crash reporting so you can move quickly and focus on your users.


Firebase is a backend platform for building Web, Android, and iOS applications. It offers real-time database, different APIs, multiple authentication types and hosting platform. This is an introductory tutorial, which covers the basics of the Firebase platform and explains how to deal with its various components and sub-components.

Build apps with Firebase
  • Real-time Database
  • Storage
  • Notifications
  • Authentication
  • Hosting
Prerequisites
  • Visual Studio 2017 or Later(Windows or Mac)
Setting up a Xamarin.Forms Project

Start by creating a new Xamarin.Forms project. You’ll learn more by going through the steps yourself.or download source here

https://github.com/susairajs/Xamarin-Firebase-RealtimeDatabase

Visual Studio 2019 has more options in the opening window. Clone or check out the code from any repository or, open a project or solution for your computer.

Now, you need to click "Create a new project".


Now, filter by Project Type: Mobile

Choose the Mobile App (Xamarin. forms) project under C# and Mobile.


Name your app. You probably want your project and solution to use the same name as your app. Put it on your preferred location for projects and click "Create".


Now, select the blank app and target platforms - Android, iOS and Windows (UWP).


Subsequently, go to the solution. In there, you get all the files and sources of your project (.NET Standard). Now, select XAML page and double-click to open the MainPage.Xaml page.


You now have a basic Xamarin.Forms app. Click the Play button to try it out.

Create a project in Firebase

In this step, create a project in Firebase. Go to the following link.

https://console.firebase.google.com/

Click "Add Project".


Now, Give the project name and select your country then Read the terms. Afterward, click "Create project".


Now, your project is ready, click continue.


In this step Choose Database under the Project Overview. Now click to Create the database.


In this step, give read and write rules.


Now, your Firebase Realtime Database ready. you can use your database api uri here.


Setting up the User Interface

Go to MainPage.Xaml and write the following code.

MainPage.xaml

Click the Play button to try it out.


NuGet Packages

Now, add the following NuGet Packages.
  • FirebaseDatabase.net
Add FirebaseDatabase.net NuGet

Go to Solution Explorer and select your solution. Right-click and select "Manage NuGet Packages for Solution". Search "FirebaseDatabase.net" and add Package. Remember to install it for each project (.NET Standard, Android, iO, and UWP).


Create a Model

In this step, you can create a model for deserializing your response.

Person.cs

Connect Firebase

Now, Write the following code Connect your Firebase Realtime Database

Read All

Now, write the code to read all data from Firebase Realtime Database.

FirebaseHelper.cs

MainPage.Xaml.cs

Click the Play button to try it out.


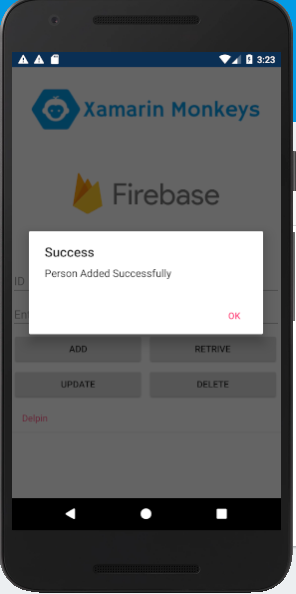
Insert

Now, write the following code to insert data into Firebase Realtime Database.

Click the Play button to try it out.


Read

Now, write the following code to read data from Firebase Realtime Database.

Click the Play button to try it out.


Update

Now, write the following code to update data to Firebase Realtime Database.

Click the Play button to try it out.


Delete

Now, write the following code to delete data from Firebase Realtime Database.

Click the Play button to try it out.


Full code

FirebaseHelper.cs

MainPage.Xaml.cs

I hope you have understood, how to use Firebase Realtime Database with CRUD Operations in Xamarin.Forms. Thanks for reading. Please share your comments and feedback.

Happy Coding :)