Showing posts with label SQLite. Show all posts
Delpin Susai Raj Wednesday, 6 February 2019

Xamarin.Forms - SQLite Database CRUD Operations

In this blog post, you will learn how to use SQLite Database with CRUD Operations in Xamarin.Forms.


Introduction
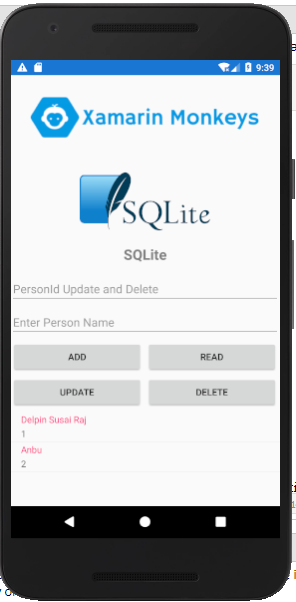


Xamarin.Forms code runs on multiple platforms - each of which has its own filesystem. This means that reading and writing files is most easily done using the native file APIs on each platform. Alternatively, embedded resources are a simpler solution to distribute data files with an app.

SQLite


  1. SQLite is a Light weight database that implements a small, fast, self-contained, high-reliability, full-featured, SQL database engine. 
  2. SQLite is the most used database in the world. It is built into all mobile phones.


Prerequisites


  • Visual Studio 2017 or Later(Windows or Mac)


Setting up a Xamarin.Forms Project

Start by creating a new Xamarin.Forms project. You’ll learn more by going through the steps yourself.or download source here

https://github.com/susairajs/XamarinForms-SQLite

Visual Studio 2019 has more options in the opening window. Clone or check out the code from any repository or, open a project or solution for your computer.

Now, you need to click "Create a new project".


Now, filter by Project Type: Mobile
Choose the Mobile App (Xamarin. forms) project under C# and Mobile.

Name your app. You probably want your project and solution to use the same name as your app. Put it on your preferred location for projects and click "Create".

Now, select the blank app and target platforms - Android, iOS and Windows (UWP).
Subsequently, go to the solution. In there, you get all the files and sources of your project (.NET Standard). Now, select XAML page and double-click to open the MainPage.Xaml page.

You now have a basic Xamarin.Forms app. Click the Play button to try it out.


Setting up the User Interface

Go to MainPage.Xaml and write the following code.

MainPage.xaml


Click the Play button to try it out.


NuGet Packages

Now, add the following NuGet Packages.


  • sqlite-net-pc


Add sqlite-net-pc NuGet

Go to Solution Explorer and select your solution. Right-click and select "Manage NuGet Packages for Solution". Search "sqlite-net-pc" and add Package. Remember to install it for each project (.NET Standard, Android, iO, and UWP).


Create a Model

In this step, you can create a model for create a table.

Person.cs


Get Local File Path

Now, Write the following code to get local file path for storing the database in App.xaml.cs

App.xaml.cs


Create a Table 

In this step, Write the following code to create a SQLite Connection and create the table in SQLiteHelper.cs constructor.

SQLiteHelper.cs


Read All

Now, write the code to read all data from SQLite Database.

SQLiteHelper.cs


MainPage.Xaml.cs


Click the Play button to try it out.


Insert

Now, write the following code to insert data into SQLite Database.


Click the Play button to try it out.


Read

Now, write the following code to read data from SQLite Database.


Click the Play button to try it out.


Update

Now, write the following code to update data to SQLite Database.


Click the Play button to try it out.


Delete

Now, write the following code to delete data from SQLite Database.


Click the Play button to try it out.


Full code

SQLiteHelper.cs


MainPage.Xaml.cs


I hope you have understood, how to use SQLite Database with CRUD Operations in Xamarin.Forms. Thanks for reading. Please share your comments and feedback.

Happy Coding :)
Delpin Susai Raj Wednesday, 9 August 2017

SQLite Insert Operation in Xamarin iOS

In this article, you will learn how to Insert Data into SQLite DataBase in Xamarin iOS, using Xamarin Studio.

Introduction

Xamarin is a platform to develop cross-platform and multi-platform apps (for example, Windows phone, Android, iOS). In Xamarin platform, the code sharing concept is used. In Xamarin Studio, Visual Studio is also available.


Download Code Here.

SQLite Create Operation

Prerequisites


  • Xamarin Studio.
  • Xcode.


The steps given below are required to be followed in order to Insert Data into SQLite DataBase in Xamarin iOS, using Xamarin Studio.


Step 1

Go To Xamarin Studio.
Click New Solution—> select iOS—>select App--> Choose single View App. Afterwards, click Next.


Step 2

In this step, configure your app. Give the app name (Ex:sample), Organization Identifier. Afterwards, click Next.


Step 3

In this step, give your project name (Ex: Sample) and solution name (Ex: Sample). Give the path of your project. Afterwards, click Create.


Step 4

Subsequently, go to the solution. In the solution, get all the files and sources in your project. Now, select Main.storyboard and double click to open Main.storyboard page.


Step 5

After opening the Main.storyboard, you can design this page, as per your desire.


Step 6

In this step design your app.using storyboard and Toolbox.


  1. Button(btnCreateDB)
  2. Button(btnInsert)
  3. TextField(txtName)
  4. TextField(txtAge)
  5. Label(lblDbPath)
  6. Label(lblDisplay)


Step 7

In this step add one Package in your project.


  • sqlite.net


Go to Solution Explorer—>Package—>Add Package.

Now Choose sqlite.net and select Version. Afterwards, click Add Package.


Step 8

In this step, add one class file name called (Student.cs).
This class is called Student Table.


Step 9

In this step, go to the Student.cs page. write the code given below.

Student.cs

using System;
using SQLite;

namespace XamariniOSSQLite
{
 public class Student
 {
  [PrimaryKey,AutoIncrement]
  public int id { get; set; }
  public string Name { get; set;}
  public string Age { get; set;}
 }
}


Step 10

In this step, go to the ViewController.cs page. write the code given below.

ViewController.cs


using System;
using UIKit;
using System.IO;
using SQLite;

namespace XamariniOSSQLite
{
 public partial class ViewController : UIViewController
 {
  public static string DbName = "SQLitedb.db3";
  public static string DbPath =Path.Combine(Environment.GetFolderPath(Environment.SpecialFolder.MyDocuments),DbName);
  protected ViewController(IntPtr handle) : base(handle)
  {
   // Note: this .ctor should not contain any initialization logic.
  }

  public override void ViewDidLoad()
  {
   base.ViewDidLoad();
   // Perform any additional setup after loading the view, typically from a nib.
  }

  partial void BtnInsert_TouchUpInside(UIButton sender)
  {
   InsertData();
  }

  partial void BtnCreate_TouchUpInside(UIButton sender)
  {
   CreateDB();
  }

  public void CreateDB()
  {
   try
   {
    var db = new SQLiteConnection(DbPath);
    db.CreateTable();

    lblDBName.Text = "DB Path:" + DbPath;
   }
   catch (Exception e)
   {
    Console.WriteLine(e);
   }

  }

  public void InsertData()
  {
   try
   {
    string name = txtName.Text;
    string age = txtAge.Text;
    var student = new Student { Name = name, Age = age };
    var db = new SQLiteConnection(DbPath);
    db.Insert(student);
    lblDisplay.Text = name + ":" + age;
    
   }
   catch (Exception e)
   {
    Console.WriteLine(e);
   }
  }

  public override void DidReceiveMemoryWarning()
  {
   base.DidReceiveMemoryWarning();
   // Release any cached data, images, etc that aren't in use.
  }
 }
}


Step 11

Now, go to Run option , choose Debug and the list of iPhone and iPad simulators, which are available. You can choose any one simulator and run it.


Output

After a few seconds, the app will start running on your iPhone simulator.You will see your app working successfully.


You can click Create DB button .Now The SQLite DataBase will be Created Successfully.After Give input and Click insert Data will be Inserted Successfully


Summary

This was the process of how to Insert Data into SQLite DataBase in Xamarin iOS , using Xamarin Studio.

Delpin Susai Raj Thursday, 3 August 2017

SQLite With Xamarin iOS

In this article, you will learn how to Create a SQLite DataBase in Xamarin iOS, using Xamarin Studio.

Introduction

Xamarin is a platform to develop cross-platform and multi-platform apps (for example, Windows phone, Android, iOS). In Xamarin platform, the code sharing concept is used. In Xamarin Studio, Visual Studio is also available.


Browse Code Here.


Prerequisites

  • Xamarin Studio.
  • Xcode.


The steps given below are required to be followed in order to Create a Create a SQLite DataBase in Xamarin iOS, using Xamarin Studio.

Step 1

Go To Xamarin Studio.
Click New Solution—> select iOS—>select App--> Choose single View App. Afterwards, click Next.


Step 2

In this step, configure your app. Give the app name (Ex:sample), Organization Identifier. Afterwards, click Next.


Step 3

In this step, give your project name (Ex: Sample) and solution name (Ex: Sample). Give the path of your project. Afterwards, click Create.


Step 4

Subsequently, go to the solution. In the solution, get all the files and sources in your project. Now, select Main.storyboard and double click to open Main.storyboard page.


Step 5

After opening the Main.storyboard, you can design this page, as per your desire.


Step 6

In this step design your app.using storyboard and Toolbox.


  1. Button(btnCreateDB)
  2. Label(lblDbName)
  3. Label(lblDbPath)


Step 7

In this step add one Package in your project.


  • sqlite.net


Go to Solution Explorer—>Package—>Add Package.

Now Choose  sqlite.net  and select Version. Afterwards, click Add Package.


Step 8

In this step, add one class file name called (Student.cs).
This class is called Student Table.


Step 9

In this step, go to the Student.cs page. write the code given below.

Student.cs

using System;
using SQLite;

namespace XamariniOSSQLite
{
 public class Student
 {
  [PrimaryKey,AutoIncrement]
  public int id { get; set; }
  public string Name { get; set;}
  public string Age { get; set;}
 }
}


Step 10

In this step, go to the ViewController.cs page. write the code given below.

ViewController.cs

using System;
using UIKit;
using System.IO;
using SQLite;

namespace XamariniOSSQLite
{
 public partial class ViewController : UIViewController
 {
  public static string DbName = "SQLitedb.db3";
  public static string DbPath =Path.Combine(Environment.GetFolderPath(Environment.SpecialFolder.MyDocuments),DbName);
  protected ViewController(IntPtr handle) : base(handle)
  {
   // Note: this .ctor should not contain any initialization logic.
  }

  public override void ViewDidLoad()
  {
   base.ViewDidLoad();
   // Perform any additional setup after loading the view, typically from a nib.
  }

  partial void BtnCreate_TouchUpInside(UIButton sender)
  {
   CreateDB();
  }

  public void CreateDB()
  {
   try
   {
    var db = new SQLiteConnection(DbPath);
    db.CreateTable();

    lblDBName.Text = "DB Name:" + DbName;
    lblPath.Text = "DB Path:" + DbPath;
   }
   catch (Exception e)
   {
    Console.WriteLine(e);
   }

  }

  public override void DidReceiveMemoryWarning()
  {
   base.DidReceiveMemoryWarning();
   // Release any cached data, images, etc that aren't in use.
  }
 }
}


Step 11

Now, go to Run option , choose Debug and the list of iPhone and iPad simulators, which are available. You can choose any one simulator and run it.


Output

After a few seconds, the app will start running on your iPhone simulator.You will see your app working successfully.


You can click Create BD button .


Now The SQLite DataBase will be Created Successfully.

Summary

This was the process of how to Create a SQLite DataBase in Xamarin iOS , using Xamarin Studio.