Delpin Susai Raj Thursday 31 May 2018

Store Images On App Directory in Xamarin iOS

In this blog, you will learn how to Store Images On App Directory in Xamarin iOS.


Introduction

Xamarin is a platform to develop cross-platform and multi-platform apps (for example, Windows phone, Android, iOS). In Xamarin platform, the code sharing concept is used. In Xamarin Studio, Visual Studio is also available.


Browse Code Here


Prerequisites


  • Xamarin Studio.
  • Xcode.


The steps given below are required to be followed in order to Store Images On App Directory in Xamarin iOS, using Xamarin Studio.

Step 1

Go To Xamarin Studio.

Click New Solution—> select iOS—>select App--> Choose single View App. Afterwards, click Next.


Step 2

In this step, configure your app. Give the app name (Ex:sample), Organization Identifier. Afterwards, click Next.


Step 3

In this step, give your project name (Ex: Sample) and solution name (Ex: Sample). Give the path of your project. Afterwards, click Create.


Step 4

Subsequently, go to the solution. In the solution, get all the files and sources in your project. Now, select Main.storyboard and double click to open Main.storyboard page.


Step 5

After opening the Main.storyboard, you can design this page, as per your desire.


Step 6

In this step design your app.using storyboard, Toolbox and Properties.


  1. Button(btnStore).
  2. Label(lblPath)
  3. ImageView(imgProfile).


Step 7

In this step, add the Image form your Local system.

Go to Solution—>Resource-->Right click-->Add-->Add Files.Now, you can choose the required Image. Click open.

Next, choose Copy the Files to the directory. Afterwards, click Ok.


Step 8


In this step, go to the ViewController.cs page. write the code given below.

ViewController.cs


using System;
using System.IO;
using Foundation;
using UIKit;

namespace XamariniOSImageStore
{
 public partial class ViewController : UIViewController
 {
  protected ViewController(IntPtr handle) : base(handle)
  {
   // Note: this .ctor should not contain any initialization logic.
  }

  string fileName;
  string folderPath = Environment.GetFolderPath(Environment.SpecialFolder.Personal);
  int Count = 0;
  public override void ViewDidLoad()
  {
   base.ViewDidLoad();
   // Perform any additional setup after loading the view, typically from a nib.
  }

  partial void UIButton8_TouchUpInside(UIButton sender)
  {
   StoreImage("Xamarin.jpg");
  }

  public void StoreImage(string filename)
  {
   if (File.Exists(fileName))
   {
    Count++;
    string filenames = "image" + Count.ToString() + ".jpg";
    fileName = Path.Combine(folderPath, filenames);
   }
   else
   {
    fileName = Path.Combine(folderPath, "image.jpg");
   }

   var img = UIImage.FromFile(filename);

   NSData image = img.AsJPEG();
   NSError err = null;


   image.Save(fileName, false, out err);

   lblPath.Text = "File Path:" + fileName;
   imgProfile.Image = UIImage.FromFile(fileName);

  }


  public override void DidReceiveMemoryWarning()
  {
   base.DidReceiveMemoryWarning();
   // Release any cached data, images, etc that aren't in use.
  }
 }
}


Step 9

Now, go to Run option , choose Debug and the list of iPhone and iPad simulators, which are available. You can choose any one simulator and run it.


Output

After a few seconds, the app will start running on your iPhone simulator.You will see your app working successfully.


You can click Store Button, The image will be Store Successfully.

After, Go to check your App Directory


Summary

This was the process of how to Store Images On App Directory  in Xamarin ios , using Xamarin Studio.
Delpin Susai Raj Wednesday 30 May 2018

Xamarin.Forms - Capture ScreenShot Using DependencyService

In this blog, you will learn How to Capture ScreenShot Using DependencyService in Xamarin.forms


Introduction

Xamarin.Forms code runs on multiple platforms - each of which has its own filesystem. This means that reading and writing files are the most easily done tasks using native file APIs on each platform. Alternatively, embedded resources are also a simpler solution to distribute the data files with an app.


DependencyService

DependencyService allows apps to call into platform-specific functionality from shared code. This functionality enables Xamarin.Forms apps to do anything that a native app can do.

DependencyService is a dependency resolver. In practice, an interface is defined and DependencyService finds the correct implementation of that interface from the various platform projects.


Xamarin.Forms apps need three components to use DependencyService


  1. Interface – The required functionality is defined by an interface in shared code.
  2. Implementation Per Platform – Classes that implement the interface must be added to each platform project.
  3. Registration – Each implementing class must be registered with DependencyService via a metadata attribute. Registration enables DependencyService to find the implementing class and supply it in place of the interface at runtime.
  4. Call to DependencyService – Shared code needs to explicitly call DependencyService to ask for implementations of the interface.


Prerequisites
  • Visual Studio 2017(Windows or Mac)
Setting up a Xamarin.Forms Project

Start by creating a new Xamarin.Forms project. You’ll learn more by going through the steps yourself.
Choose the  Cross-platform App project under Visual C#-->Cross-platform in the New Project dialog.


Now Select the Blank App and Choose Portable Class Library(PCL).


You now have a basic Xamarin.Forms app. Click the Play button to try it out.


Setting up the User Interface.

Go to MainPage.Xaml and write the following code.


MainPage.Xaml


Click the Play button to try it out.


Creating Interface

Create - interface in Xamarin.Forms PCL.

Go to Solution—>PCL—>Right click—>New—>Interface—>IScreen.cs.


Now, write the following code.

IScreen.cs


Implementation per platform

Android Implementation

Go to Solution—>Android —>Right click—>New—>Class—> ScreenHelper.cs


Now, write the following code for Capture Current Screen.


ScreenHelper.cs

Call to DependencyService

In this step, call the DependencyService for your PCL.


MainPage.Xaml.cs


Click the Play button to try it out.


I hope you have understood how to Capture ScreenShot Using DependencyService.

Thanks for reading. Please share comments and feedback.


Delpin Susai Raj Monday 28 May 2018

Create an Popup View in Xamarin iOS

In this blog, you will learn how to Create A Popup View in Xamarin iOS.


Introduction

Xamarin is a platform to develop cross-platform and multi-platform apps (for example, Windows phone, Android, iOS). In Xamarin platform, the code sharing concept is used. In Xamarin Studio, Visual Studio is also available.


Prerequisites


  • Xamarin Studio.
  • Xcode.


The steps given below are required to be followed in order to Create A Popup View in Xamarin iOS, using Xamarin Studio.

Step 1

Go To Xamarin Studio.

Click New Solution—> select iOS—>select App--> Choose single View App. Afterwards, click Next.


Step 2

In this step, configure your app. Give the app name (Ex:sample), Organization Identifier. Afterwards, click Next.


Step 3

In this step, give your project name (Ex: Sample) and solution name (Ex: Sample). Give the path of your project. Afterwards, click Create.


Step 4

Subsequently, go to the solution. In the solution, get all the files and sources in your project. Now, select Main.storyboard and double click to open Main.storyboard page.


Step 5

After opening the Main.storyboard, you can design this page, as per your desire.


Step 6

Now, go to the toolbox Window. In the toolbox Window, get all the types of the tools and controls. You need to go to the toolbox Window. Now, scroll down and you will see all the tools and controls. You need to drag and drop the Button.
Next You need to align the Button, using constraints.


Step 7

Now, go to the properties Window. Select the Button and give a name (Ex:btnPopub).


Step 8

You need to drag and drop the View.
Next You need to align the View, using constraints.


Step 9

Now, go to the properties Window. Select the View and give a name (Ex:viewPopup).


Step 10

You need to drag and drop the Button on the View.
Next You need to align the Button, using constraints. And set the name Value in property window (Ex:btnOK).


Step 11

You need to drag and drop the Label on the View.
Next You need to align the Label, using constraints. And set the name Value in property window (Ex:lblNotification).


Step 12

Now, go to the properties Window. Select the View and Check the Hidden option.


Step 13


In this step, go to the ViewController.cs page. write the code given below.

ViewController.cs


using System;

using UIKit;

namespace XamariniOSPopup
{
 public partial class ViewController : UIViewController
 {
  protected ViewController(IntPtr handle) : base(handle)
  {
   // Note: this .ctor should not contain any initialization logic.
  }

  public override void ViewDidLoad()
  {
   base.ViewDidLoad();
   // Perform any additional setup after loading the view, typically from a nib.
  }

  partial void BtnOk_TouchUpInside(UIButton sender)
  {
   viewPopup.Hidden = true;
  }

  partial void BtnPopup_TouchUpInside(UIButton sender)
  {
   viewPopup.Hidden = false;

  }

  public override void DidReceiveMemoryWarning()
  {
   base.DidReceiveMemoryWarning();
   // Release any cached data, images, etc that aren't in use.
  }
 }
}


Step 14

Now, go to Run option , choose Debug and the list of iPhone and iPad simulators, which are available. You can choose any one simulator and run it.


Output

After a few seconds, the app will start running on your iPhone simulator.You will see your app working successfully.


You can click the Popup Button, the popup window will be showed successfully.

Summary

This was the process of how to Create an Popup View in Xamarin iOS , using Xamarin Studio.


Xamarin.Forms - Borderless Editor Using Custom Renderer


In this article, how to create a Borderless Editor Using Custom Renderer in Xamarin.forms


Introduction

Xamarin.Forms code runs on multiple platforms - each of which has its own filesystem. This means that reading and writing files are the most easily done tasks using native file APIs on each platform. Alternatively, embedded resources are also a simpler solution to distribute the data files with an app.

Custom Renderers

Xamarin.Forms user interfaces are rendered using the native controls of the target platform, allowing Xamarin.Forms applications to retain the appropriate look and feel for each platform. Custom Renderers let developers override this process to customize the appearance and behavior of Xamarin.Forms controls on each platform.

For more information


Prerequisites
  • Visual Studio 2017(Windows or Mac)
Setting up a Xamarin.Forms Project

Start by creating a new Xamarin.Forms project. You’ll learn more by going through the steps yourself.
Choose the  Cross-platform App project under Visual C#-->Cross-platform in the New Project dialog.


Now Select the Blank App and Choose Portable Class Library(PCL).


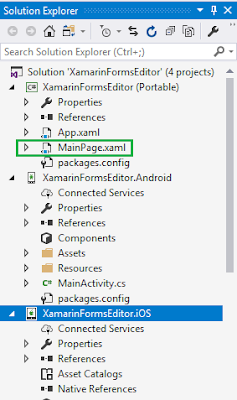
Subsequently, go to the solution. In there, you get all the files and sources of your project (PCL). Now, select XAML page and double-click to open the MainPage.Xaml page.
You now have a basic Xamarin.Forms app. Click the Play button to try it out.


In this step create a default Editor control with border.


Now, write the following code.

MainPage.xaml

Click the Play button to try it out.


Create a Custom Editor

Now, Create an Inherit class form Editor for Customizing the Editor control.

Go to Solution—>PCL—>Right click—>New—>Class—>XEditor.cs.


Now, write the following code.


XEditor.cs

Making Your Android Implementation

In this step create an inherit Class form, EditorRenderer for customizing the Editor control

Go to Solution.Droid—>Class—> XEditorRenderer.cs


Now, write the code given below.

XEditorRenderer.cs


Setting up the User Interface.

Now,  Add a Customized Editor control to your app. Go to MainPage.Xaml and write the following code.


MainPage.Xaml

Go to MainPage.Xaml.cs and write the following code(optional).


MainPage.Xaml.cs


Click the Play button to try it out.


I hope you have understood how to Create a Borderless Editor Using Custom Renderer.

Thanks for reading. Please share comments and feedback.