
In this blog, you will learn how to turn on or off flashlight. Using Xamarin.Essentials in Xamarin forms.
Introduction
- Xamarin.Forms - AppInfo Using Xamarin Essentials
- Xamarin.Forms - DeviceInfo Using Xamarin Essentials
- Xamarin.Forms - Check Internet Connection Using Xamarin Essentials
- Xamarin.Forms - Clipboard (Copy And Paste Text) Using Xamarin Essentials

Xamarin.Forms code runs on multiple platforms - each of which has its own filesystem. This means that reading and writing files is most easily done using the native file APIs on each platform. Alternatively, embedded resources are a simpler solution to distribute data files with an app.
Xamarin.Essentials

Xamarin.Essentials plugin provides 20+ cross-platform APIs for mobile application development. Xamarin.Essentials API works with all Xamarin.Forms, Xamarin.Android, Xamarin.iOS, or UWP application that can be accessed from shared code. When we are developing Xamarin with Android, iOS and UWP apps but now Xamarin.Essentials overcome the problem, developers can access every native platform API using C#. This plugin provides many APIs so initially, there is no need of more plugins for Xamarin. Xamarin.Essentials plugin impacts your app's minimum size.
Platform Support
Xamarin.Essentials supports platforms and operating systems
Platform Version
Android 4.4 (API 19) or earlier
iOS 10.0 or higher
UWP 10.0.16299.0 or earlier
Prerequisites
- Visual Studio 2017(Windows or Mac)
Setting up a Xamarin.Forms Project
Start by creating a new Xamarin.Forms project. you’ll learn more by going through the steps yourself.
Choose the Xamarin.Forms App Project type under Cross-platform/App in the New Project dialog.

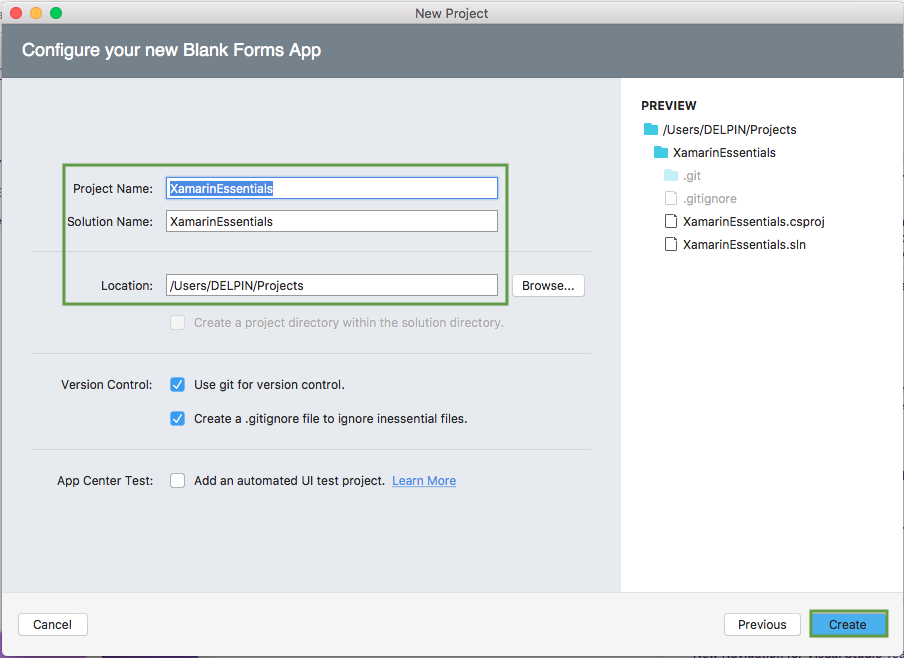
Name your app, select “Use Portable Class Library” for shared code, and target both Android and iOS.

You probably want your project and solution to use the same name as your app. Put it in your preferred folder for projects and click Create.
You now have a basic Xamarin.Forms app. Click the play button to try it out.

Setting up the User Interface
Go to MainPage.Xaml and write the following code.MainPage.xaml
Add Xamarin Essentials
In this step, add Xamarin.Essentials to your project. You can install Xamarin.Essentials via NuGet, or you can browse the source code on GitHub.
Go to Solution Explorer and select your solution. Right-click and select "Manage NuGet Packages for Solution". Search "Xamarin.Essentials" and add Package. Remember to install it for each project (PCL, Android, iO, and UWP).

Xamarin.Essentials requires platform-specific setup
AndroidThe following steps are necessary for Android.
- Xamarin.Essentials supports a minimum Android version of 4.4
- Target Android version for compiling must be 8.1, API level 27.
MainActivity.cs
Xamarin.Essentials must receive any OnRequestPermissionsResult. write the following code for runtime permission.
MainActivity.cs
iOS
No additional setup required.
UWP
No additional setup required.
Permissions
In this step give the following required permissions to your app:
- CAMERA
- FLASHLIGHT
- It supports Device only not Simulator/Emulator
MainPage.xaml.cs
async void Handle_Clicked(object sender, System.EventArgs e)
        {
            try
            {
                // Turn On Flashlight
                await Flashlight.TurnOnAsync();
            }
            catch (FeatureNotSupportedException fnsEx)
            {
                await ShowAlert(fnsEx.Message);
            }
            catch (PermissionException pEx)
            {
                await ShowAlert(pEx.Message);
            }
            catch (Exception ex)
            {
                await ShowAlert(ex.Message);
            }
        }
Now, write the following code for Off Flashlight.
MainPage.xaml.cs
async void Handle_Clicked_1(object sender, System.EventArgs e)
        {
            try
            {
                // Turn Off Flashlight
                await Flashlight.TurnOffAsync();
            }
            catch (FeatureNotSupportedException fnsEx)
            {
                await ShowAlert(fnsEx.Message);
            }
            catch (PermissionException pEx)
            {
                await ShowAlert(pEx.Message);
            }
            catch (Exception ex)
            {
                await ShowAlert(ex.Message);
            }
        }
Full code - MainPage.xaml.cs
using Xamarin.Forms;
using Xamarin.Essentials;
namespace XamarinEssentials
{
    public partial class MainPage : ContentPage
    {
        public MainPage()
        {
            InitializeComponent();
        }

        async void Handle_Clicked(object sender, System.EventArgs e)
        {
            try
            {
                // Turn On Flashlight
                await Flashlight.TurnOnAsync();
            }
            catch (FeatureNotSupportedException fnsEx)
            {
                await ShowAlert(fnsEx.Message);
            }
            catch (PermissionException pEx)
            {
                await ShowAlert(pEx.Message);
            }
            catch (Exception ex)
            {
                await ShowAlert(ex.Message);
            }
        }

        async void Handle_Clicked_1(object sender, System.EventArgs e)
        {
            try
            {
                // Turn Off Flashlight
                await Flashlight.TurnOffAsync();
            }
            catch (FeatureNotSupportedException fnsEx)
            {
                await ShowAlert(fnsEx.Message);
            }
            catch (PermissionException pEx)
            {
                await ShowAlert(pEx.Message);
            }
            catch (Exception ex)
            {
                await ShowAlert(ex.Message);
            }
        }

        public async Task ShowAlert(string message)
        {
            await DisplayAlert("Faild", message, "Ok");
        }
    }
}
Click the play button to try it out.
Related post
- Xamarin.Forms - AppInfo Using Xamarin Essentials
- Xamarin.Forms - DeviceInfo Using Xamarin Essentials
- Xamarin.Forms - Check Internet Connection Using Xamarin Essentials
- Xamarin.Forms - Clipboard (Copy And Paste Text) Using Xamarin Essentials
I hope you have understood how to turn on or off flashlight Using Xamarin Essentials in Xamarin.Forms.
Thanks for reading. Please share comments and feedback.


