
In this article, you will learn how to Check Internet Connectivity in Xamarin iOS, using Xamarin Studio.
Introduction
Xamarin is a platform to develop cross-platform and multi-platform apps (for example, Windows Phone, Android, iOS). In Xamarin platform, the code sharing concept is used. In Xamarin Studio, Visual Studio is also available.
Browse Code Here.

Two Ways To check Internet Connectivity
- Xam.Plugin.Connectivity Plugin
- Reachability
- Xamarin Studio.
- Xcode.
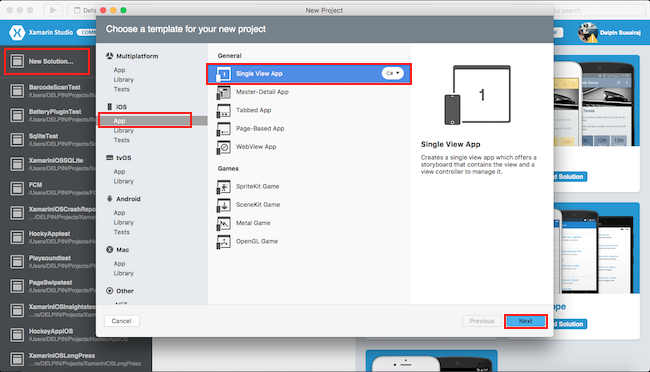
Step 1
Go To Xamarin Studio.
Click New Solution—> select iOS—>select App--> Choose single View App. Afterwards, click Next.
Step 2
In this step, configure your app. Give the app name (Ex: sample), Organization Identifier. Afterwards, click Next.

Step 3
In this step, give your project name (Ex: Sample) and solution name (Ex: Sample). Give the path of your project. Afterwards, click Create.

Step 4
Subsequently, go to the solution. In the solution, get all the files and sources in your project. Now, select Main.storyboard and double-click to open Main.storyboard page.

Step 5
After opening the Main.storyboard, you can design this page, as per your desire.

In this step design your app.using storyboard and Toolbox.
- Button(btnCreateDB)
- Label(lblStatus)
- Label(lblCheck)

Step 7
In this step add one Package in your project.
- Connectivity Plugin for Xamarin and Windows.
Now ChooseConnectivity Plugin for Xamarin and Windows and select Version. Afterwards, click Add Package.

Step 8
In this step, go to the ViewController.cs page. write the code given below.
ViewController.cs

Step 9
Now, go to Run option, choose Debug and the list of iPhone and iPad simulators, which are available. You can choose any one simulator and run it.

Output
After a few seconds, the app will start running on your iPhone simulator.You will see your app working successfully.

You can click Check Button. The internet Connection will check two ways is successfully.
If network is unavailable.

Summary
This was the process of how to Check Internet Connectivity in Xamarin iOS, using Xamarin Studio.


