Delpin Susai Raj Thursday, 16 December 2021

Xamarin.Forms - Style Inheritance

In this blog post, you will learn how to implement Style Inheritance in Xamarin.Forms app.

Introduction

Xamarin.Forms code runs on multiple platforms - each of which has its own filesystem. This means that reading and writing files is most easily done using the native file APIs on each platform. Alternatively, embedded resources are a simpler solution to distribute data files with an app.

Style Inheritance

Style inheritance is performed by setting the Style.BasedOn property to an existing Style. In XAML, this is achieved by setting the BasedOn property to a StaticResource markup extension that references a previously created Style.

Prerequisites

  • Visual Studio 2017 or later (Windows or Mac)

Setting up a Xamarin.Forms Project

Start by creating a new Xamarin.Forms project. You wíll learn more by going through the steps yourself. 

Create a new or existing Xamarin forms(.Net standard) Project. With Android and iOS Platform. 

BaseStyle

Now, I'm going to create the base style for buttons in App.Xaml

App.Xaml

<?xml version="1.0" encoding="utf-8"?>
<Application xmlns="http://xamarin.com/schemas/2014/forms" xmlns:x="http://schemas.microsoft.com/winfx/2009/xaml" xmlns:d="http://xamarin.com/schemas/2014/forms/design" xmlns:mc="http://schemas.openxmlformats.org/markup-compatibility/2006" mc:Ignorable="d" x:Class="XamarinApp.App">
<Application.Resources>
<Style x:Key="BaseButtonStyle" TargetType="Button">
<Setter Property="TextColor" Value="White" />
<Setter Property="BorderWidth" Value="1" />
<Setter Property="BorderColor" Value="Blue" />
<Setter Property="FontSize" Value="20" />
</Style>
</Application.Resources>
</Application>

Style Inheritance

RedButtonStyle

Here, I'm going to inhert base style into the RedbuttonStyle in App.Xaml. See below example

RedButtonStyle.xaml

<?xml version="1.0" encoding="utf-8"?>
<Application xmlns="http://xamarin.com/schemas/2014/forms" xmlns:x="http://schemas.microsoft.com/winfx/2009/xaml" xmlns:d="http://xamarin.com/schemas/2014/forms/design" xmlns:mc="http://schemas.openxmlformats.org/markup-compatibility/2006" mc:Ignorable="d" x:Class="XamarinApp.App">
<Application.Resources>
<Style x:Key="BaseButtonStyle" TargetType="Button">
<Setter Property="TextColor" Value="White" />
<Setter Property="BorderWidth" Value="1" />
<Setter Property="BorderColor" Value="Blue" />
<Setter Property="FontSize" Value="20" />
</Style>
<Style x:Key="RedButtonStyle" TargetType="Button"
BasedOn="{StaticResource BaseButtonStyle}">
<Setter Property="BackgroundColor" Value="Red" />
</Style>
</Application.Resources>
</Application>

GreenButtonStyle

Here, I'm going to inhert base style into the RedbuttonStyle in App.Xaml. See below example

GreenButtonStyle.xaml

<?xml version="1.0" encoding="utf-8"?>
<Application xmlns="http://xamarin.com/schemas/2014/forms" xmlns:x="http://schemas.microsoft.com/winfx/2009/xaml" xmlns:d="http://xamarin.com/schemas/2014/forms/design" xmlns:mc="http://schemas.openxmlformats.org/markup-compatibility/2006" mc:Ignorable="d" x:Class="XamarinApp.App">
<Application.Resources>
<Style x:Key="BaseButtonStyle" TargetType="Button">
<Setter Property="TextColor" Value="White" />
<Setter Property="BorderWidth" Value="1" />
<Setter Property="BorderColor" Value="Blue" />
<Setter Property="FontSize" Value="20" />
</Style>
<Style x:Key="GreenButtonStyle" TargetType="Button"
BasedOn="{StaticResource BaseButtonStyle}">
<Setter Property="BackgroundColor" Value="Green" />
</Style>
<Style x:Key="RedButtonStyle" TargetType="Button"
BasedOn="{StaticResource BaseButtonStyle}">
<Setter Property="BackgroundColor" Value="Red" />
</Style>
</Application.Resources>
</Application>

Consume Style

Now, I'm going to consume the style into my button.

MainPage.Xaml

<?xml version="1.0" encoding="UTF-8"?>
<ContentPage xmlns="http://xamarin.com/schemas/2014/forms"
xmlns:x="http://schemas.microsoft.com/winfx/2009/xaml"
xmlns:xct="http://xamarin.com/schemas/2020/toolkit"
x:Class="XamarinApp.LoginPage">
<ContentPage.Resources>
</ContentPage.Resources>
<ContentPage.Content>
<StackLayout HorizontalOptions="Fill" Margin="50,100" VerticalOptions="Start">
<Label Text="Style Inheritance" FontSize="Large"/>
<Button Style="{StaticResource RedButtonStyle}" Text="Red Button"/>
<Button Style="{StaticResource GreenButtonStyle}" Text="Green Button"/>
</StackLayout>
</ContentPage.Content>
</ContentPage>
view raw MainPage.Xaml hosted with ❤ by GitHub

Run 

I hope you have understood you will learn how to implement Style Inheritance in Xamarin.Forms.

Thanks for reading. Please share your comments and feedback. 

Happy Coding :)

Delpin Susai Raj Thursday, 25 November 2021

Xamarin.Forms - Validation using Xamarin Community Toolkit Part 2

In this blog post, you will learn how to validate xaml elements using Xamarin Community Toolkit in Xamarin.Forms App

Introduction

Part 1: https://xamarinmonkeys.blogspot.com/2021/11/xamarinforms-validation-using-xamarin.html

Xamarin.Forms code runs on multiple platforms - each of which has its own filesystem. This means that reading and writing files is most easily done using the native file APIs on each platform. Alternatively, embedded resources are a simpler solution to distribute data files with an app.

Xamarin Community Toolkit

Xamarin Community Toolkit is a collection of reusable elements for mobile development with Xamarin.Forms, including animations, behaviors, converters, effects, and helpers. It simplifies and demonstrates common developer tasks when building iOS, Android, macOS, WPF and UWP apps using Xamarin.Forms.

The Xamarin Community Toolkit is available as a Visual Studio NuGet package for new or existing Xamarin.Forms projects.

Validation Behaviours

1. CharactersValidationBehavior

2. EmailValidationBehavior

3. MultiValidationBehavior

4. NumericValidationBehavior

5. RequiredStringValidationBehavior

6. TextValidationBehavior

7. UriValidationBehavior

References

  • https://docs.microsoft.com/en-us/xamarin/community-toolkit/behaviors/
  • https://github.com/xamarin/XamarinCommunityToolkit

Prerequisites

  • Visual Studio 2017 or later (Windows or Mac)

Let's Start

Setting up a Xamarin.Forms Project

Start by creating a new Xamarin.Forms project. You will learn more by going through the steps yourself.

Create a new or existing Xamarin forms(.Net standard) Project. With Android and iOS Platform. 

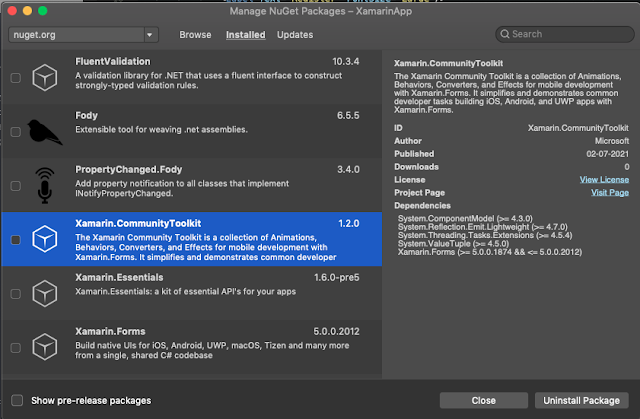
Install Xamarin.CommunityToolkit NuGet

Install the following Nuget from Nuget Manager In your Visual Studio.

Xamarin.CommunityToolkit

NumericValidation

NumericValidationBehavior is a behavior that allows the user to determine if text input is a valid numeric value. For example, an Entry control can be styled differently depending on whether a valid or an invalid numeric input is provided. 

Xaml code

<Entry>
<Entry.Behaviors>
<xct:NumericValidationBehavior
InvalidStyle="{StaticResource InvalidEntryStyle}"
MinimumValue="1.0"
MaximumValue="100.0"
/>
</Entry.Behaviors>
</Entry>

More details

https://docs.microsoft.com/en-us/xamarin/community-toolkit/behaviors/numericvalidationbehavior

Result

RequiredStringValidation

RequiredStringValidationBehavior is a behavior that allows the user to determine if text input is equal to specific text. For example, an Entry control can be styled differently depending on whether a valid or an invalid text input is provided.

Xaml code

<Entry Placeholder="Enter password">
<Entry.Behaviors>
<xct:RequiredStringValidationBehavior
InvalidStyle="{StaticResource InvalidEntryStyle}"
RequiredString="password"
/>
</Entry.Behaviors>
</Entry>

More details

https://docs.microsoft.com/en-us/xamarin/community-toolkit/behaviors/requiredstringvalidationbehavior

Result

TextValidation

TextValidationBehavior is a behavior that allows the user to validate a given text depending on specified parameters. By adding this behavior to an Entry control it can be styled differently depending on whether a valid or an invalid text value is provided.

Xaml Code

<Entry>
<Entry.Behaviors>
<xct:TextValidationBehavior
InvalidStyle="{StaticResource InvalidEntryStyle}"
MaximumLength="5"
MinimumLength="2"
/>
</Entry.Behaviors>
</Entry>

More details

https://docs.microsoft.com/en-us/xamarin/community-toolkit/behaviors/textvalidationbehavior

Result


UriValidation

UriValidationBehavior is a behavior that allows users to determine whether or not text input is a valid URI. For example, an Entry control can be styled differently depending on whether a valid or an invalid URI is provided.

Xaml code

<Entry>
<Entry.Behaviors>
<xct:UriValidationBehavior
UriKind="Absolute"
InvalidStyle="{StaticResource InvalidEntryStyle}"
/>
</Entry.Behaviors>
</Entry>

More details

https://docs.microsoft.com/en-us/xamarin/community-toolkit/behaviors/urivalidationbehavior

Result

Conclusion

I hope you have understood how to validate xaml elements using Xamarin Community Toolkit in Xamarin.Forms App

Thanks for reading. Please share your comments and feedback. Happy Coding :)

Delpin Susai Raj Thursday, 11 November 2021

Xamarin.Forms - Validation using Xamarin Community Toolkit

In this blog post, you will learn how to validate xaml elements using Xamarin Community Toolkit in Xamarin.Forms App

Introduction

Xamarin.Forms code runs on multiple platforms - each of which has its own filesystem. This means that reading and writing files is most easily done using the native file APIs on each platform. Alternatively, embedded resources are a simpler solution to distribute data files with an app.

Xamarin Community Toolkit

Xamarin Community Toolkit is a collection of reusable elements for mobile development with Xamarin.Forms, including animations, behaviors, converters, effects, and helpers. It simplifies and demonstrates common developer tasks when building iOS, Android, macOS, WPF and UWP apps using Xamarin.Forms.

The Xamarin Community Toolkit is available as a Visual Studio NuGet package for new or existing Xamarin.Forms projects.

Validation Behaviours

  1. CharactersValidationBehavior
  2. EmailValidationBehavior
  3. MultiValidationBehavior
  4. NumericValidationBehavior
  5. RequiredStringValidationBehavior
  6. TextValidationBehavior
  7. UriValidationBehavior

References

  • https://docs.microsoft.com/en-us/xamarin/community-toolkit/behaviors/
  • https://github.com/xamarin/XamarinCommunityToolkit

Prerequisites

  • Visual Studio 2017 or later (Windows or Mac)

Let's Start

Setting up a Xamarin.Forms Project 

Start by creating a new Xamarin.Forms project. You will learn more by going through the steps yourself.

Create a new or existing Xamarin forms(.Net standard) Project. With Android and iOS Platform. 

Install Xamarin.CommunityToolkit NuGet

Install the following Nuget from Nuget Manager In your Visual Studio.

  • Xamarin.CommunityToolkit

CharactersValidation

CharactersValidationBehavior is a behavior that allows the user to validate text input depending on specified parameters. 

Following CharacterType you can validate

public enum CharacterType
{
/// <summary>Lowercase characters are allowed.</summary>
LowercaseLetter = 1,
/// <summary>Uppercase characters are allowed.</summary>
UppercaseLetter = 2,
/// <summary>Either lowercase characters or uppercase characters are allowed.</summary>
Letter = LowercaseLetter | UppercaseLetter,
/// <summary>Digits are allowed.</summary>
Digit = 4,
/// <summary>Characters and digits are allowed.</summary>
Alphanumeric = Letter | Digit,
/// <summary>Whitespace is allowed.</summary>
Whitespace = 8,
/// <summary>Non-alphanumeric symbols are allowed.</summary>
NonAlphanumericSymbol = 16,
/// <summary>Lowercase latin characters are allowed.</summary>
LowercaseLatinLetter = 32,
/// <summary>Uppercase latin characters are allowed.</summary>
UppercaseLatinLetter = 64,
/// <summary>Either latin lowercase characters or latin uppercase characters are allowed.</summary>
LatinLetter = LowercaseLatinLetter | UppercaseLatinLetter,
/// <summary>Any type of character or digit either lowercase or uppercase, latin or non-latin is allowed.</summary>
Any = Alphanumeric | NonAlphanumericSymbol | Whitespace
}
view raw CharType.cs hosted with ❤ by GitHub

Xaml Code

Here the sample is validating Numeric with 5 character.

<Entry.Behaviors>
<xct:CharactersValidationBehavior
InvalidStyle="{StaticResource InvalidEntryStyle}"
CharacterType="Digit"
MaximumCharacterCount="5"
/>
</Entry.Behaviors>
view raw XAMLCode.xaml hosted with ❤ by GitHub

Result

The value should below 5 char only if it's greater than 5 it's shows error when you submit.

More info

https://docs.microsoft.com/en-us/xamarin/community-toolkit/behaviors/charactersvalidationbehavior

EmailValidation

EmailValidationBehavior is a behavior that allows users to determine whether or not text input is a valid email address.

Xaml code

<Entry Placeholder="Email">
<Entry.Behaviors>
<xct:EmailValidationBehavior
DecorationFlags="Trim"
InvalidStyle="{StaticResource InvalidEntryStyle}"
/>
</Entry.Behaviors>
</Entry>
view raw XAMLCode.xaml hosted with ❤ by GitHub

Regex validation

<Entry Placeholder="Email">
<Entry.Behaviors>
<xct:EmailValidationBehavior
RegexPattern="^([\w\.\-]+)@([\w\-]+)((\.(\w){2,3})+)$"
InvalidStyle="{StaticResource InvalidEntryStyle}"
/>
</Entry.Behaviors>
</Entry>
view raw XAMLCode.xaml hosted with ❤ by GitHub

More info

https://docs.microsoft.com/en-us/xamarin/community-toolkit/behaviors/emailvalidationbehavior

Result

MultiValidation

MultiValidationBehavior is a behavior that allows the user to combine multiple validators to validate text input depending on specified parameters. For example, an Entry control can be styled differently depending on whether a valid or an invalid text input is provided.

Xaml code

<Entry Placeholder="Password">
<Entry.Behaviors>
<xct:MultiValidationBehavior
InvalidStyle="{StaticResource InvalidEntryStyle}">
<xct:TextValidationBehavior
MinimumLength="6" />
<xct:CharactersValidationBehavior
CharacterType="Digit"
MinimumCharacterCount="1" />
<xct:CharactersValidationBehavior
CharacterType="LowercaseLetter"
MinimumCharacterCount="1" />
<xct:CharactersValidationBehavior
CharacterType="UppercaseLetter"
MinimumCharacterCount="1" />
<xct:CharactersValidationBehavior
CharacterType="NonAlphanumericSymbol"
MinimumCharacterCount="1" />
<xct:CharactersValidationBehavior
CharacterType="Whitespace"
MaximumCharacterCount="0" />
</xct:MultiValidationBehavior>
</Entry.Behaviors>
</Entry>
view raw XAMLCode.xaml hosted with ❤ by GitHub

More info

https://docs.microsoft.com/en-us/xamarin/community-toolkit/behaviors/multivalidationbehavior

Result

Conclusion

I hope you have understood how to validate xaml elements using Xamarin Community Toolkit in Xamarin.Forms App

Thanks for reading. Please share your comments and feedback. Happy Coding :)


Delpin Susai Raj Wednesday, 27 October 2021

Xamarin.Forms - Validation using Fluent Validation in MVVM

In this blog post, you will learn how to use fluent validation in MVVM in Xamarin.Forms App

Introduction

Xamarin.Forms code runs on multiple platforms - each of which has its own filesystem. This means that reading and writing files is most easily done using the native file APIs on each platform. Alternatively, embedded resources are a simpler solution to distribute data files with an app.

Fluent Validation

Fluent Validation is one of the best Libraries for Xamarin.Forms it's used to validate XAML Controls. Fluent Validation is used to create the validation logic separate from business logic. Fluent validation is used to lambda expressions for building validation rules for your business objects.

References

https://github.com/james-russo/XamarinForms-UnobtrusiveValidationPlugin

Prerequisites

  • Visual Studio 2017 or later (Windows or Mac)

Let's Start

Setting up a Xamarin.Forms Project

Start by creating a new Xamarin.Forms project. You will learn more by going through the steps yourself. 

Create a new or existing Xamarin forms(.Net standard) Project. With Android and iOS Platform. 

Setup UI

Now, Create a UI for your requirement. I just created a simple login page for validation purposes.

LoginPage.xaml

<?xml version="1.0" encoding="UTF-8"?>
<ContentPage xmlns="http://xamarin.com/schemas/2014/forms" xmlns:x="http://schemas.microsoft.com/winfx/2009/xaml" x:Class="XamarinApp.LoginPage">
<ContentPage.Content>
<StackLayout HorizontalOptions="Fill" Margin="50,100" VerticalOptions="Start">
<Label Text="Login" FontSize="Large"/>
<Entry Placeholder="Username" Text="{Binding UserName}"/>
<Entry Placeholder="Password" IsPassword="True" Text="{Binding Password}"/>
<Label TextColor="Red" Text="{Binding LoginError}"/>
<Button Text="Login" Command="{Binding LoginCommand}"/>
</StackLayout>
</ContentPage.Content>
</ContentPage>
view raw LoginPage.xaml hosted with ❤ by GitHub

LoginPageViewModel

Here, you can write your business logic for your requirement. I just add simple login validation only. LoginCommand will validate the login form.

LoginPageViewModel.cs

using System;
using System.ComponentModel;
using Xamarin.Forms;
using XamarinApp.Validations;
namespace XamarinApp.ViewModels
{
public class LoginPageViewModel : INotifyPropertyChanged
{
#region Fields
private string _username;
private Command _LoginCommand;
LoginValidation loginValidation;
#endregion
#region Constructor
[Obsolete]
public LoginPageViewModel()
{
loginValidation = new LoginValidation();
}
#endregion
#region Properties
public event PropertyChangedEventHandler PropertyChanged;
public string UserName
{
get { return _username; }
set
{
_username = value;
OnPropertyChanged(nameof(UserName));
}
}
public string Password { get; set; }
public string LoginError { get; set; }
public Command LoginCommand
{
get
{
return _LoginCommand ?? (_LoginCommand = new Command(ExecuteLoginCommand));
}
}
#endregion
#region Methods
public void ExecuteLoginCommand()
{
var result = loginValidation.Validate(this);
if (result.IsValid)
LoginError = string.Empty;
}
protected void OnPropertyChanged(string name)
{
PropertyChangedEventHandler handler = PropertyChanged;
if (handler != null)
{
handler(this, new PropertyChangedEventArgs(name));
}
}
#endregion
}
}

Install Fluent Validation NuGet

Install the following Nuget from Nuget Package Manager In your Visual Studio.

Fluent Validation

Create Fluent Validator

Now, Create a validator class in .Net Standard or PCL Library for your ViewModel or your business logic. I create LoginValidator for my LoginPageViewModel.

LoginValidation.cs

using System;
using FluentValidation;
using XamarinApp.ViewModels;
namespace XamarinApp.Validations
{
public class LoginValidation: AbstractValidator<LoginPageViewModel>
{
public LoginValidation()
{
RuleFor(x => x.UserName).NotNull().OnFailure(x=>x.LoginError="Username or Password is Missing");
RuleFor(x => x.Password).NotNull().OnFailure(x => x.LoginError = "Username or Password is Missing");
}
}
}

Here I just added the NotNull check validation with the failure message. You can explore more features for the Fluent validation

https://github.com/james-russo/XamarinForms-UnobtrusiveValidationPlugin

Result

The below image for login validation failed.

The Login validation is Success

Conclusion

I hope you have understood how to validate objects using fluent validation in MVVM in Xamarin.Forms App

Thanks for reading. Please share your comments and feedback. Happy Coding :)

Delpin Susai Raj Tuesday, 26 October 2021

Xamarin.Forms - How to use Fody property in MVVM

 In this blog post, you will learn how to use Fody in MVVM in Xamarin.Forms App

Introduction

Xamarin.Forms code runs on multiple platforms - each of which has its own filesystem. This means that reading and writing files is most easily done using the native file APIs on each platform. Alternatively, embedded resources are a simpler solution to distribute data files with an app.

Fody

Fody is a library for IL weaving (the process to manipulate/inject code in IL). Fody will update automatically our code for us to add new cool features.

Fody is Injects code which raises the PropertyChanged event, into property setters of classes which implement INotifyPropertyChanged.

Prerequisites

  • Visual Studio 2017 or later (Windows or Mac)

Let's Start

Setting up a Xamarin.Forms Project

 Start by creating a new Xamarin.Forms project. You will learn more by going through the steps yourself.

 Create a new or existing Xamarin forms(.Net standard) Project. With Android and iOS Platform. 

Setup UI

Now, Create a UI for your requirement. I just created a simple UI for LoginPage

LoginPage.xaml

<?xml version="1.0" encoding="UTF-8"?>
<ContentPage xmlns="http://xamarin.com/schemas/2014/forms" xmlns:x="http://schemas.microsoft.com/winfx/2009/xaml" x:Class="XamarinApp.LoginPage">
<ContentPage.Content>
<StackLayout HorizontalOptions="Fill" Margin="50,100" VerticalOptions="Start">
<Label Text="Login" FontSize="Large"/>
<Entry Placeholder="Username" Text="{Binding UserName}"/>
<Entry Placeholder="Password" IsPassword="True" Text="{Binding Password}"/>
<Label Text=""/>
<Button Text="Login"/>
</StackLayout>
</ContentPage.Content>
</ContentPage>
view raw LoginPage.xaml hosted with ❤ by GitHub

Normal Property Creation with Data Binding

The Data Binding is the connection between the XAML and ViewModel of your app. You use it to connect a control (ex: text) of your UI to your logic. Let’s assume that we have an Entry and we want to link it to our ViewModel.

Following code is as we use to create the view model property be like.

LoginPage.Xaml.cs

public class LoginPageViewModel: INotifyPropertyChanged
{
#region Fields
private string _username;
#endregion
#region Constructor
public LoginPageViewModel()
{
}
#endregion
#region Properties
public event PropertyChangedEventHandler PropertyChanged;
public string UserName {
get { return _username; }
set {
_username = value;
OnPropertyChanged(nameof(UserName));
}
}
#endregion
#region Methods
protected void OnPropertyChanged(string name)
{
PropertyChangedEventHandler handler = PropertyChanged;
if (handler != null)
{
handler(this, new PropertyChangedEventArgs(name));
}
}
#endregion
}

Result

Install Fody

Install the following Nuget from Nuget Manager In your Visual Studio.

  1. Fody
  2. PropertyChanged.Fody
In your project install the Fody plugin (only in your PCL/.Net Standard project, you don’t need to install it in the Android, iOS, UWP projects

Fody NuGet

PropertyChanged.Fody

Add FodyWeavers.xml

Add FodyWeavers.xml file in your .net standard project.

<?xml version="1.0" encoding="utf-8"?>
<Weavers xmlns:xsi="http://www.w3.org/2001/XMLSchema-instance" xsi:noNamespaceSchemaLocation="FodyWeavers.xsd">
<PropertyChanged />
</Weavers>
view raw FodyWeavers.xml hosted with ❤ by GitHub

Fody Properties

Now, Simply add property with { get; set; }. 

public class LoginPageViewModel: INotifyPropertyChanged
{
//Fody
public string Password { get; set; }
}

Result

Conclusion

I hope you have understood how to use fody in MVVM in Xamarin.Forms App

Thanks for reading. Please share your comments and feedback. Happy Coding :)

Delpin Susai Raj Thursday, 30 September 2021

Xamarin.Forms - ContentView Lifecycle

In this blog post, you will learn how to use OnAppearing and OnDisAppearing in ContentView in Xamarin forms.

Introduction

Xamarin.Forms code runs on multiple platforms - each of which has its own filesystem. This means that reading and writing files is most easily done using the native file APIs on each platform. Alternatively, embedded resources are a simpler solution to distribute data files with an app.

ContentView LifeCycle

  • OnAppearing - raised when a View is about to appear on the screen.
  • OnDisAppearing - raised when a View is about to disappear from the screen.

Problem

In Xamarin.froms Content view or any custom view we develop. Here there are no lifecycle methods like OnStart, OnAppearing. this one is a major requirement for Xamarin.forms.

Solution

There is one workaround for OnAppearing and OnDisappearing in ContentView we can invoke the parent page OnAppearing and OnDisAppearing to our ContentView. Please follow all steps.

Prerequisites

  • Visual Studio 2017 or later (Windows or Mac)

Let's Start,

Setting up a Xamarin.Forms Project

Start by creating a new Xamarin.Forms project. You will learn more by going through the steps yourself.

Create a new or existing Xamarin forms(.Net standard) Project. With Android and iOS Platform.

Create Interface

Here, need to create an interface for the renderer resolver

IRendererResolver.cs

public interface IRendererResolver
{
object GetRenderer(VisualElement element);
bool HasRenderer(VisualElement element);
}

Platform Implementation

Android Implementation

Create AndroidRendererResolver in your android project. And add the following code snippets.

AndroidRendererResolver.cs

[assembly: Dependency(typeof(AndroidRendererResolver))]
namespace XamarinStudy.Droid.Renderer
{
public class AndroidRendererResolver: IRendererResolver
{
public object GetRenderer(VisualElement element)
{
return Xamarin.Forms.Platform.Android.Platform.GetRenderer(element);
}
public bool HasRenderer(VisualElement element)
{
return GetRenderer(element) != null;
}
}
}

iOS Implementation

Create an iOSRenderderResolver for iOS in your iOS project. And copy-paste the following code.

IosRendererResolver.cs

[assembly: Dependency(typeof(IosRendererResolver))]
namespace XamarinStudy.iOS.Renderer
{
public class IosRendererResolver: IRendererResolver
{
public object GetRenderer(VisualElement element)
{
return Xamarin.Forms.Platform.iOS.Platform.GetRenderer(element);
}
public bool HasRenderer(VisualElement element)
{
return GetRenderer(element) != null;
}
}
}

Setup UI

Now, create a UI for your requirement in your ContentView.

CommonListview.xaml

<?xml version="1.0" encoding="UTF-8" ?>
<ContentView
xmlns="http://xamarin.com/schemas/2014/forms"
xmlns:x="http://schemas.microsoft.com/winfx/2009/xaml"
xmlns:sfl="clr-namespace:Syncfusion.ListView.XForms;assembly=Syncfusion.SfListView.XForms"
xmlns:sfp="clr-namespace:Syncfusion.SfPullToRefresh.XForms;assembly=Syncfusion.SfPullToRefresh.XForms"
x:Class="XamarinStudy.CustomView.CommonListview">
<ContentView.Content>
<ListView ItemsSource="{Binding ProductList}" ItemSelected="ListView_ItemSelected">
<ListView.ItemTemplate>
<DataTemplate>
<ViewCell>
<StackLayout HeightRequest="100">
<Label Text="{Binding .}"/>
</StackLayout>
</ViewCell>
</DataTemplate>
</ListView.ItemTemplate>
</ListView>
</ContentView.Content>
</ContentView>

ContentView LifeCycle

Following code for OnAppearing and OnDisAppearing in your ContentView. Now you can do whatever you want in your ContentView OnAppearing and OnDisAppearing.

CommonListView.xaml.cs

public partial class CommonListview : ContentView
{
public CommonListview()
{
InitializeComponent();
}
private ContentPage _parentPage;
private bool _registered;
protected virtual void OnAppearing()
{
}
protected virtual void OnDisappearing()
{
}
protected override void OnPropertyChanged([CallerMemberName] string propertyName = null)
{
base.OnPropertyChanged(propertyName);
if (propertyName.Equals("Renderer", StringComparison.OrdinalIgnoreCase))
{
var rr = DependencyService.Get<IRendererResolver>();
if (rr.HasRenderer(this))
{
Unregister();
var parent = Parent;
while (parent?.Parent != null && !(parent is ContentPage))
{
parent = parent.Parent;
}
if (parent is ContentPage page)
{
_parentPage = page;
Register();
}
}
else
{
Unregister();
}
}
}
private void Register()
{
if (_parentPage != null && !_registered)
{
_parentPage.Appearing += OnAppearing;
_parentPage.Disappearing += OnDisappearing;
_registered = true;
}
}
private void Unregister()
{
if (_parentPage != null && _registered)
{
_parentPage.Appearing -= OnAppearing;
_parentPage.Disappearing -= OnDisappearing;
_registered = false;
_parentPage = null;
}
}
private void OnAppearing(object sender, EventArgs e)
{
OnAppearing();
}
private void OnDisappearing(object sender, EventArgs e)
{
OnDisappearing();
}
}

OnAppearing

See below screenshot of the breakpoint triggered in OnAppearing when the view is loaded.

OnDisAppearing

See below screenshot of the breakpoint triggered in OnDisAppearing when the view is unloaded.

Conclusion

I hope you have understood how to use add OnAppearing and OnDisAppearing in ContentView in Xamarin.Forms App.

Thanks for reading. Please share your comments and feedback. Happy Coding :)


Delpin Susai Raj Monday, 12 July 2021

Xamarin.Forms - Working with Behaviors in Xamarin.froms

 In this blog post, you will learn how to use Behaviors in Xamarin.Forms App

Introduction

Xamarin.Forms code runs on multiple platforms - each of which has its own filesystem. This means that reading and writing files is most easily done using the native file APIs on each platform. Alternatively, embedded resources are a simpler solution to distribute data files with an app.

Behaviors

Behaviors lets you add functionality to user interface controls without having to subclass them. Behaviors are written in code and added to controls in XAML or code.

Behaviors are the best way to validate the user inputs such as email, phone number, etc.

Prerequisites

  • Visual Studio 2017 or later (Windows or Mac)

Let's Start

Setting up a Xamarin.Forms Project

 Start by creating a new Xamarin.Forms project. You will learn more by going through the steps yourself.

Create a new or existing Xamarin forms(.Net standard) Project. With Android and iOS Platform. 

Setup UI

Now, Create a UI for your requirement. I just created a simple entry for validation purposes.

MainPage.xaml

<?xml version="1.0" encoding="utf-8"?>
<ContentPage xmlns="http://xamarin.com/schemas/2014/forms"
xmlns:x="http://schemas.microsoft.com/winfx/2009/xaml"
xmlns:d="http://xamarin.com/schemas/2014/forms/design"
xmlns:mc="http://schemas.openxmlformats.org/markup-compatibility/2006"
xmlns:TitleView="clr-namespace:XamarinApp.CustomView"
xmlns:xct="http://xamarin.com/schemas/2020/toolkit"
mc:Ignorable="d" x:Class="XamarinApp.MainPage">
<NavigationPage.TitleView>
<TitleView:TitleView/>
</NavigationPage.TitleView>
<StackLayout Margin="0,50,0,0" VerticalOptions="StartAndExpand">
<Image VerticalOptions="Center" Source="xamarinmonkeysbanner.png"/>
<Entry AutomationId="EntryPhoneNumber" Placeholder="Enter Phone Number" x:Name="entryPhoneNumber">
</Entry>
</StackLayout>
</ContentPage>
view raw MainPage.Xaml hosted with ❤ by GitHub

Add Behaviors

Create a new class and inherit from Behavior<T> into the class. Now I'm going to write Behavior to Entry for simple mobile number validation.

Need to implement OnAttachedTo and OnDetachingFrom from Behavior<T>

protected override void OnAttachedTo(Entry bindable)
{
base.OnAttachedTo(bindable);
}
protected override void OnDetachingFrom(Entry bindable)
{
base.OnDetachingFrom(bindable);
}

EntryBehaviour.cs

using System;
using System.Text.RegularExpressions;
using Xamarin.Forms;
namespace XamarinApp
{
public class EntryBehaviour: Behavior<Entry>
{
protected override void OnAttachedTo(Entry bindable)
{
base.OnAttachedTo(bindable);
bindable.TextChanged += Bindable_TextChanged;
}
private void Bindable_TextChanged(object sender, TextChangedEventArgs e)
{
string phoneNumberRegax = "^[0-9]{10}$";
var entry = sender as Entry;
if (!string.IsNullOrWhiteSpace(entry.Text))
{
if (Regex.IsMatch(entry.Text, phoneNumberRegax,
RegexOptions.IgnoreCase))
{
entry.TextColor = Color.Green;
}
else
entry.TextColor = Color.Red;
}
else
entry.TextColor = Color.Red;
}
protected override void OnDetachingFrom(Entry bindable)
{
base.OnDetachingFrom(bindable);
bindable.TextChanged -= Bindable_TextChanged;
}
}
}

Consuming Behaviors

Now, Consume your Behavior in XAML UI Element. See below sample.

Ex: xmlns:behaviors="clr-namespace:XamarinApp"

Add Namespace

<ContentPage xmlns="http://xamarin.com/schemas/2014/forms"
xmlns:x="http://schemas.microsoft.com/winfx/2009/xaml"
xmlns:d="http://xamarin.com/schemas/2014/forms/design"
xmlns:mc="http://schemas.openxmlformats.org/markup-compatibility/2006"
xmlns:TitleView="clr-namespace:XamarinApp.CustomView"
xmlns:behaviors="clr-namespace:XamarinApp"
xmlns:xct="http://xamarin.com/schemas/2020/toolkit"
mc:Ignorable="d" x:Class="XamarinApp.MainPage">
view raw MainPage.Xaml hosted with ❤ by GitHub

Add Attach property of Behavior in your XAML Control like below.

<Entry AutomationId="EntryPhoneNumber" Placeholder="Enter Phone Number" x:Name="entryPhoneNumber">
<Entry.Behaviors>
<behaviors:EntryBehaviour/>
</Entry.Behaviors>
</Entry>
view raw MainPage.Xaml hosted with ❤ by GitHub

Full Code

You can get the full UI code below.

MainPage.Xaml

<?xml version="1.0" encoding="utf-8"?>
<ContentPage xmlns="http://xamarin.com/schemas/2014/forms"
xmlns:x="http://schemas.microsoft.com/winfx/2009/xaml"
xmlns:d="http://xamarin.com/schemas/2014/forms/design"
xmlns:mc="http://schemas.openxmlformats.org/markup-compatibility/2006"
xmlns:TitleView="clr-namespace:XamarinApp.CustomView"
xmlns:behaviors="clr-namespace:XamarinApp"
xmlns:xct="http://xamarin.com/schemas/2020/toolkit"
mc:Ignorable="d" x:Class="XamarinApp.MainPage">
<NavigationPage.TitleView>
<TitleView:TitleView/>
</NavigationPage.TitleView>
<StackLayout Margin="0,50,0,0" VerticalOptions="StartAndExpand">
<Image VerticalOptions="Center" Source="xamarinmonkeysbanner.png"/>
<Entry AutomationId="EntryPhoneNumber" Placeholder="Enter Phone Number" x:Name="entryPhoneNumber">
<Entry.Behaviors>
<behaviors:EntryBehaviour/>
</Entry.Behaviors>
</Entry>
</StackLayout>
</ContentPage>
view raw MainPage.Xaml hosted with ❤ by GitHub

Result

Conclusion

I hope you have understood how to use Behaviors in Xamarin.Forms App.

Thanks for reading. Please share your comments and feedback. Happy Coding :)
Delpin Susai Raj Thursday, 1 July 2021

Xamarin.Forms - App Shortcuts Using Xamarin.Essentials

In this blog post, you will learn how to add shortcuts using Xamarin.Essentials in Xamarin.Forms App

Introduction

Xamarin.Forms code runs on multiple platforms - each of which has its own filesystem. This means that reading and writing files is most easily done using the native file APIs on each platform. Alternatively, embedded resources are a simpler solution to distribute data files with an app.

App Actions

Xamarin.Essentials provided one of the best API for App Actions, by clicking the App icon will display the menu option if choose the option app will be navigating the appropriate page or link.

Prerequisites

  • Visual Studio 2017 or later (Windows or Mac)
  • Xamarin.Essentials 1.6 or later

Setting up a Xamarin.Forms Project

Start by creating a new Xamarin.Forms project. You will learn more by going through the steps yourself.

Create a new or existing Xamarin forms(.Net standard) Project. With Android and iOS Platform. 

Install Xamarin.Essential Nuget

Note: Make sure you must install Xamarin.Essentials 1.6 or later.

In this step, add Xamarin.Essentials to your project. You can install Xamarin.Essentials via NuGet, or you can browse the source code on GitHub.
Go to Solution Explorer and select your solution. Right-click and select "Manage NuGet Packages for Solution". Search "Xamarin.Essentials" and add Package. Remember to install it for each project (PCL, Android, iO, and UWP). refer below image

Android Setup

Now, Add Intentfilter for App Action in your MainActivity.cs class. Refer to the below image.

MainActivity.cs 

namespace XamarinApp.Droid
{
[Activity(Label = "XamarinApp", Icon = "@mipmap/icon", Theme = "@style/MainTheme", MainLauncher = true, ConfigurationChanges = ConfigChanges.ScreenSize | ConfigChanges.Orientation)]
[IntentFilter(
new[] { Xamarin.Essentials.Platform.Intent.ActionAppAction },
Categories = new[] { Android.Content.Intent.CategoryDefault })]
public class MainActivity : global::Xamarin.Forms.Platform.Android.FormsAppCompatActivity
{
protected override void OnCreate(Bundle savedInstanceState)
{
TabLayoutResource = Resource.Layout.Tabbar;
ToolbarResource = Resource.Layout.Toolbar;
base.OnCreate(savedInstanceState);
Xamarin.Essentials.Platform.Init(this, savedInstanceState);
global::Xamarin.Forms.Forms.Init(this, savedInstanceState);
LoadApplication(new App());
}
public override void OnRequestPermissionsResult(int requestCode, string[] permissions, [GeneratedEnum] Android.Content.PM.Permission[] grantResults)
{
Xamarin.Essentials.Platform.OnRequestPermissionsResult(requestCode, permissions, grantResults);
base.OnRequestPermissionsResult(requestCode, permissions, grantResults);
}
protected override void OnResume()
{
base.OnResume();
Xamarin.Essentials.Platform.OnResume(this);
}
protected override void OnNewIntent(Intent intent)
{
base.OnNewIntent(intent);
Xamarin.Essentials.Platform.OnNewIntent(intent);
}
}
}
view raw MainActivity.cs hosted with ❤ by GitHub


iOS Setup

Add below code in AppDelegate.cs to handle App Action in your iOS app.

AppDelegate.cs

[Register("AppDelegate")]
public partial class AppDelegate : global::Xamarin.Forms.Platform.iOS.FormsApplicationDelegate
{
public override bool FinishedLaunching(UIApplication app, NSDictionary options)
{
Xamarin.Calabash.Start();
global::Xamarin.Forms.Forms.Init();
LoadApplication(new App());
return base.FinishedLaunching(app, options);
}
public override void PerformActionForShortcutItem(UIApplication application, UIApplicationShortcutItem shortcutItem, UIOperationHandler completionHandler)
{
Platform.PerformActionForShortcutItem(application, shortcutItem, completionHandler);
}
}
view raw AppDeledate.cs hosted with ❤ by GitHub

Add Shortcuts

Now add App shortcuts in your App.Xaml.cs class OnStart Method

The following properties you can be set on an AppAction:

  1. Id: A unique identifier used to respond to the action tap.
  2. Title: the visible title to display.
  3. Subtitle: If supported a sub-title to display under the title.
  4. Icon: Must match icons in the corresponding resources directory on each platform.

App.xaml.cs

protected async override void OnStart()
{
try
{
await AppActions.SetAsync(
new AppAction("app_info", "App Info", icon: "info.png"),
new AppAction("battery_info", "Battery Info",icon:"battery.png"));
}
catch (FeatureNotSupportedException ex)
{
Debug.WriteLine("App Actions not supported");
}
}
view raw App.xaml.cs hosted with ❤ by GitHub

Responding To Actions

Now, Register actions for shortcuts in App.xaml.cs constructor.

When an app action is selected the event will be sent with information as to which action was selected.

App.xaml.cs

public App()
{
InitializeComponent();
MainPage = new NavigationPage(new MainPage());
AppActions.OnAppAction += AppActions_OnAppAction;
}
void AppActions_OnAppAction(object sender, AppActionEventArgs e)
{
if (Application.Current != this && Application.Current is App app)
{
AppActions.OnAppAction -= app.AppActions_OnAppAction;
return;
}
Device.BeginInvokeOnMainThread(async () =>
{
Page pageName=new Page();
if(e.AppAction.Id == "battery_info")
{
pageName=new BatteryInfoPage();
}
else if(e.AppAction.Id == "app_info")
{
pageName = new AppInfoPage();
}
if (pageName != null)
{
await Application.Current.MainPage.Navigation.PopToRootAsync();
await Application.Current.MainPage.Navigation.PushAsync(pageName);
}
});
}
view raw App.xaml.cs hosted with ❤ by GitHub


FeatureNotSupportedException

If App Actions are not supported on the specific version of the operating system a FeatureNotSupportedException will be thrown. 

Full code

You will get the full source code here.

App.xaml.cs

using System;
using Xamarin.Forms;
using Xamarin.Forms.Xaml;
using Xamarin.Essentials;
using System.Diagnostics;
namespace XamarinApp
{
public partial class App : Application
{
public App()
{
InitializeComponent();
MainPage = new NavigationPage(new MainPage());
AppActions.OnAppAction += AppActions_OnAppAction;
}
void AppActions_OnAppAction(object sender, AppActionEventArgs e)
{
if (Application.Current != this && Application.Current is App app)
{
AppActions.OnAppAction -= app.AppActions_OnAppAction;
return;
}
Device.BeginInvokeOnMainThread(async () =>
{
Page pageName=new Page();
if(e.AppAction.Id == "battery_info")
{
pageName=new BatteryInfoPage();
}
else if(e.AppAction.Id == "app_info")
{
pageName = new AppInfoPage();
}
if (pageName != null)
{
await Application.Current.MainPage.Navigation.PopToRootAsync();
await Application.Current.MainPage.Navigation.PushAsync(pageName);
}
});
}
protected async override void OnStart()
{
try
{
await AppActions.SetAsync(
new AppAction("app_info", "App Info", icon: "info.png"),
new AppAction("battery_info", "Battery Info",icon:"battery.png"));
}
catch (FeatureNotSupportedException ex)
{
Debug.WriteLine("App Actions not supported");
}
}
protected override void OnSleep()
{
}
protected override void OnResume()
{
}
}
}
view raw App.xaml.cs hosted with ❤ by GitHub

Result

iOS Simulator

Android

Conclusion

I hope you have understood how to add shortcuts using Xamarin.Essentials in Xamarin.Forms App

References

https://docs.microsoft.com/en-us/xamarin/essentials/app-actions 

Thanks for reading. Please share your comments and feedback. Happy Coding :)

Delpin Susai Raj Wednesday, 9 June 2021

Xamarin.Forms - Working with UI Tests

 In this blog, you will learn how to test Xamairn UI controls in Xamarin.Forms.

Introduction

Xamarin.Forms code runs on multiple platforms - each of which has its own filesystem. This means that reading and writing files is most easily done using the native file APIs on each platform. Alternatively, embedded resources are a simpler solution to distribute data files with an app.

Xamarin.UITest

Xamarin.UITest is a C# testing framework using NUnit for UI Acceptance Tests on iOS and Android apps. It integrates tightly with Xamarin.iOS and Xamarin.Android projects, Xamarin.UITest is the Automation Library that allows the NUnit tests to execute on Android and iOS devices. The tests interact with the user interface as a user would: entering text, tapping buttons, and gestures - such as swipes.

Like Appium and Robot Framework, Xamarin.UITest is among the best open-source, cross-platform UI testing frameworks. It’s a more straightforward choice when it comes to automating Android and iOS apps built with Xamarin.Forms. 

Follow the Arrange-Act-Assert pattern:

  • Arrange: The test will set up conditions and initialize things so that the test can be actioned.
  • Act: The test will interact with the application, enter text, pushing buttons, and so on.
  • Assert: The test examines the results of the actions run in the Act step to determine correctness. For example, the application may verify that a particular error message is displayed.

Prerequisites

  • Visual Studio 2017 or later (Windows or Mac)

Setting up a Xamarin.Forms Project

 Start by creating a new Xamarin.Forms project. You wíll learn more by going through the steps yourself.

 Create a new or existing Xamarin forms(.Net standard) Project. With Android and iOS Platform. 

Add UI Test Project

Now, Add the UI Test project to your existing Xamarin.forms project. Go to your solution add a new project select Xamarin UI Project refer to the following screenshot.

Name your UI Test project the click to add.

Use AutomationId

  1. AutomationId should be added to all UI controls that are required for UI testing.
  2. AutomationId is a Dependency Property which can also be set with a binding expression.
  3. InvalidOperationException will be thrown if an attempt is made to set the AutomationId property of an Element more than once.
  4. AutomationId and X:Name are different. You must set AutomationId for all controls.

Ex: AutomationId="EntryPhoneNumber"

Create a UI

Here, I'm going to create a simple UI for UI Testing.

MainPage.XAML

<?xml version="1.0" encoding="utf-8"?>
<ContentPage xmlns="http://xamarin.com/schemas/2014/forms"
xmlns:x="http://schemas.microsoft.com/winfx/2009/xaml"
xmlns:d="http://xamarin.com/schemas/2014/forms/design"
xmlns:mc="http://schemas.openxmlformats.org/markup-compatibility/2006"
xmlns:TitleView="clr-namespace:XamarinApp.CustomView"
mc:Ignorable="d" x:Class="XamarinApp.MainPage">
<NavigationPage.TitleView>
<TitleView:TitleView/>
</NavigationPage.TitleView>
<StackLayout Margin="0,50,0,0" VerticalOptions="StartAndExpand">
<Image VerticalOptions="Center" Source="xamarinmonkeysbanner.png"/>
<Entry AutomationId="EntryPhoneNumber" Placeholder="Enter Phone Number" x:Name="entryPhoneNumber"/>
<Button AutomationId="ValidateButton" Text="Validate" Clicked="PhoneNumberValidate"/>
<Label AutomationId="ResultLabel" x:Name="lblResult"/>
</StackLayout>
</ContentPage>
view raw MainPage.Xaml hosted with ❤ by GitHub

Configure App

Here, you need to configure both iOS and Android App paths see below code.

AppInitializer.cs

public static IApp StartApp(Platform platform)
{
if (platform == Platform.Android)
{
return ConfigureApp.Android.Debug().ApkFile("../../../XamarinApp.Android/bin/Debug/com.companyname.xamarinapp.apk").StartApp();
}
return ConfigureApp.iOS.AppBundle("../../../XamarinApp.iOS/bin/iPhoneSimulator/Debug/XamarinApp.iOS.app").StartApp();
}

 Android

You can specify your APK path. Go to your Android project debug/bin folder you can find the com.companyname.xamarinapp.apk file you copy the file path and set the ApkFile.

ConfigureApp.Android.Debug().ApkFile("../../../XamarinApp.Android/bin/Debug/com.companyname.xamarinapp.apk").StartApp();

The device can be specified using the DeviceSerial method:

ConfigureApp.Android.ApkFile("../../../XamarinApp.Android/bin/Debug/com.companyname.xamarinapp.apk")
.DeviceSerial("03f80ddae07844d3")
.StartApp();

iOS

Specify the iOS IPA path. Go to your iOS debug/bin folder you can find the AppName.iOS file you copy the file path and set the AppBundle.


ConfigureApp.iOS.AppBundle("../../../XamarinApp.iOS/bin/iPhoneSimulator/Debug/XamarinApp.iOS.app").StartApp();

iOS Enable Test Cloud

To run tests on iOS, the Xamarin Test Cloud Agent NuGet package must be added to the project. Once it's been added, Add the following code into the AppDelegate.FinishedLaunching method:

Xamarin Test Cloud Agent NuGet package

AppDelegate

public override bool FinishedLaunching(UIApplication app, NSDictionary options)
{
Xamarin.Calabash.Start();
global::Xamarin.Forms.Forms.Init();
LoadApplication(new App());
return base.FinishedLaunching(app, options);
}
view raw AppDeledate.cs hosted with ❤ by GitHub

Set Compiler Variable

Set compiler variable to your iOS app. Go to the project option in the Compiler section set define symbols. "ENABLE_TEST_CLOUD" refer below screenshot.

Write UI Test

Now, I'm going to write the Automation UI Test for PhoneNumber validation. See below code

[TestFixture(Platform.iOS)]
public class Tests
{
IApp app;
Platform platform;
public Tests(Platform platform)
{
this.platform = platform;
}
[SetUp]
public void BeforeEachTest()
{
app = AppInitializer.StartApp(platform);
}
[Test]
public void PhoneNumberValidateTest()
{
app.WaitForElement(c => c.Marked("EntryPhoneNumber"));
app.EnterText(c => c.Marked("EntryPhoneNumber"),"1234567890");
app.Tap(c => c.Marked("ValidateButton"));
AppResult[] results = app.WaitForElement(c => c.Marked("ResultLabel"));
Assert.IsTrue(results.Any());
}
}
view raw Tests.cs hosted with ❤ by GitHub

Run

The test method has been passed.

Download full source from Github

References

https://docs.microsoft.com/en-us/appcenter/test-cloud/frameworks/uitest/

I hope you have understood you will learn how to test Xamarin UI Elements Xamarin.Forms.

Thanks for reading. Please share your comments and feedback. 

Happy Coding :)