
In this article, you will learn how to Create an ToolBarItems in Xamarin.Forms, using Visual Studio.
IntroductionXamarin is a platform to develop cross-platform and multi-platform apps (for example, Windows phone, Android, iOS). In Xamarin platform, the code sharing concept is used. In Xamarin Studio, Visual Studio is also available.

Prerequisites
- Visual Studio 2017.
Step 1
Click File--> select New--> select Project. The project needs to be clicked after opening all the types of the projects in Visual Studio or click (Ctrl+Shift+N).

Step 2
After opening the New Project, select Installed-->Templates-->Visual C#-->Cross-Platform-->choose Cross Platform App. Now, give your Xamarin from app name (Ex:sample) and give the path of your project. Afterwards, click OK.

Step 3
Now, choose Blank App and select forms PCL(sharing). Afterwards, click OK.

Step 4
Now, go to Solution Explorer. In Solution Explorer, get all the files and source in your project. You can add Universal Windows Platform (UWP). In Reference, go to Solution Explorer-->Your Project-->UWP-->Reference-->Right Click --> Select Add reference.

Step 5
Now, you can select Universal Windows and select Extensions.Check.
- Windows Desktop Extension for the UWP. version:10.0.1439
- Windows Desktop Extension for the UWP. version:10.0.1058

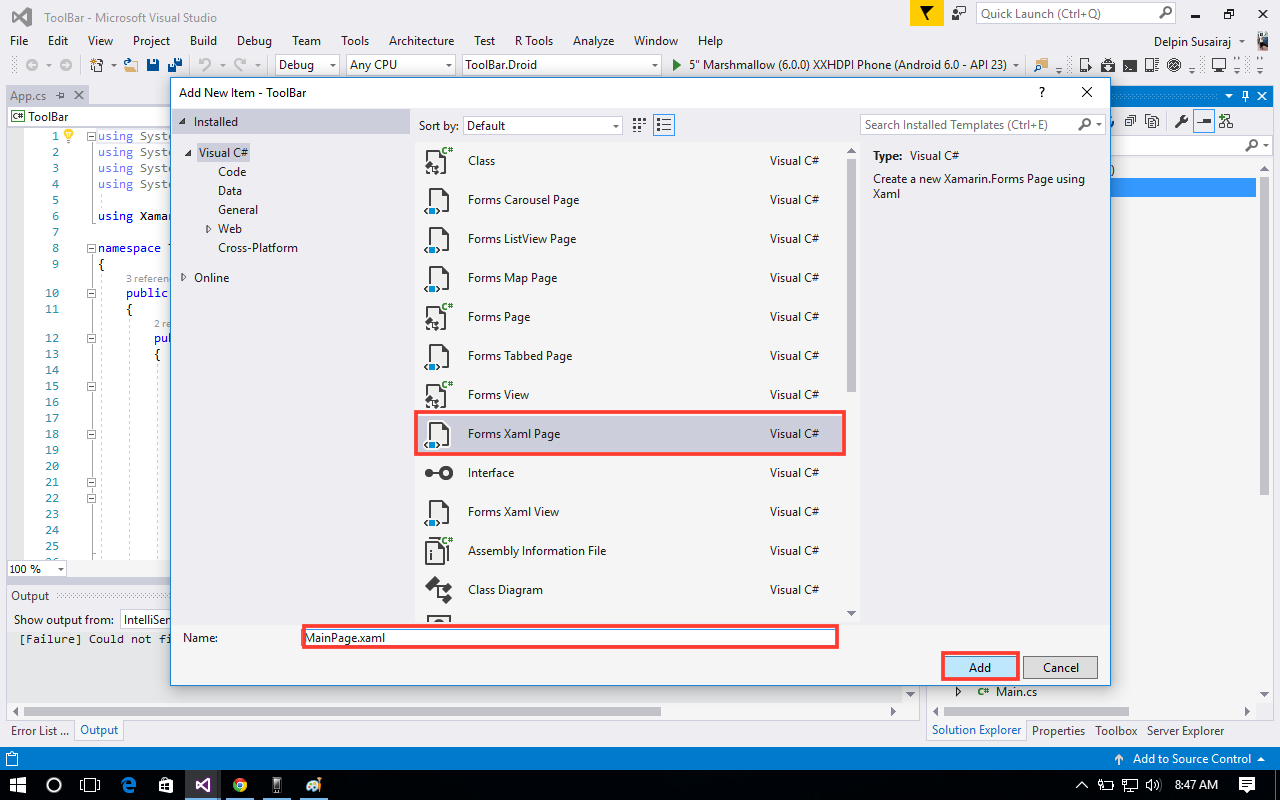
Step 6
In this step, add one Page, whose name is called MainPage.xaml. Go to Solution Explorer-->Your Project-->Portable-->Right click-->Add-->New Item (Ctrl+Shift+A).

Step 7
Now, select Forms XAML page and give the name (MainPage.xaml).
Step 8
In this step, go to the MainPage.xaml page and write the code given below.
MainPage.xaml

Step 9
In this step, go to the MainPage.xaml.cs page. write the code given below.
MainPage.xaml.cs
using Xamarin.Forms;

Step 10
In this step, go to App.cs page. Write the code, mentioned below between Public App() Method.
App.cs
public App()
        {

            MainPage = new MainPage();
        }

Step 11
Now, you can run your app. Go to the Debug configuration Manager. Choose platform and check build and deploy option. Afterwards, click close.

Step 12
If you have Windows 10 Emulator, you can run it. If you don't have it, simply run Local Machine.

Output
After few seconds, the app will start running on your Windows 10 Emulator.You will see your app is work Successfully.
You Will see the three dot in bottom of the app. and click the three dot.you will see the ToolBarItems is Work Successfully.

if you choose any ToolBarItems .it Will work Successfully.

Summary
This was the process of how to Create an ToolBarItems in Xamarin.Forms, using Visual Studio.

Thanks for sharing this informative content , Great work
ReplyDeleteLeanpitch provides online training in ICP CAT during this lockdown period everyone can use it wisely.
ICP-CAT certification
Thanks for sharing this.,
ReplyDeleteLeanpitch provides online training in Scrum Master during this lockdown period everyone can use it wisely.
Join Leanpitch 2 Days CSM Certification Workshop in different cities.
csm certification cost