Delpin Susai Raj Tuesday, 17 December 2019

Xamarin.Forms - Working with Effects

In this blog post, you will learn how to use Effect instead of Custom renderer in Xamarin.Forms.

Introduction
Xamarin.Forms code runs on multiple platforms - each of which has its own filesystem. This means that reading and writing files are most easily done using the native file APIs on each platform. Alternatively, embedded resources are a simpler solution to distribute data files with an app.

Effects

Effects simplify the customization of control.

Developers can implement their own custom Renderer classes to customize the appearance and/or behavior of a control. However, implementing a custom renderer class to perform simple control customization is often a heavy-weight. Effects simplify this process, allowing the native controls on each platform to be more easily customized.
Why Effects instead of Custom Renderer?
  1. An effect is when changing the properties of a platform-specific control will achieve the desired result.
  2. A custom renderer is required when there's a need to override methods of a platform-specific control.
  3. A custom renderer is required when there's a need to replace the platform-specific control that implements a Xamarin.Forms control.
Prerequisites
  • Visual Studio 2017 or later (Windows or Mac)
Setting up a Xamarin.Forms Project(Windows)

Start by creating a new Xamarin.Forms project. You wíll learn more by going through the steps yourself.

Now, you need to click "Create a new project".

Next, filter by Project Type: Mobile
Choose the Mobile App (Xamarin. forms) project under C# and Mobile.

Name your app. You probably want your project and solution to use the same name as your app. Put it on your preferred location for projects and click "Create".

Now, select the blank app and target platforms - Android, iOS and Windows (UWP).

Subsequently, go to the solution. In there, you get all the files and sources of your project (.NET Standard). Now, select the XAML page and double-click to open the MainPage.Xaml page.

You now have a basic Xamarin.Forms app. Click the Play button to try it out.

Create a Borderless Entry Using Effect

Now, Create an EntryEffect class and Inherit RoutingEffect class for add Effect the Entry control.

Now, write the following code.

EntryEffect.cs

using Xamarin.Forms;
namespace XamarinStudy.Common.Controls
{
public class EntryEffect: RoutingEffect
{
public EntryEffect() : base($"MyCompany.{nameof(EntryEffect)}")
{
}
}
}
view raw EntryEffect.cs hosted with ❤ by GitHub
Android Implementation

In this step, create an EntryAndroidEffect.cs class and inherit PlatformEffect Class for Add Effects the Entry control.
  • OnAttached - Override the OnAttached method and write logic to customize the control.
  • OnDetached - Override the OnDetached method and write logic to clean up the control customization, if required.
Now, write the code given below.

EntryAndroidEffect.cs

[assembly: ResolutionGroupName("MyCompany")]
[assembly: ExportEffect(typeof(XamarinStudy.Droid.Effects.EntryAndroidEffect), nameof(EntryEffect))]
namespace XamarinStudy.Droid.Effects
{
public class EntryAndroidEffect:PlatformEffect
{
protected override void OnAttached()
{
if(this.Control!=null)
{
this.Control.Background = new ColorDrawable(Android.Graphics.Color.Transparent);
}
}
protected override void OnDetached()
{
throw new NotImplementedException();
}
}
}
iOS Implementation

In this step, create an EntryiOSEffect.cs class and inherit PlatformEffect Class for Add Effects the Entry control.

Now, write the code given below.

EntryiOSEffect.cs

[assembly: ResolutionGroupName("MyCompany")]
[assembly: ExportEffect(typeof(XamarinStudy.iOS.Effects.EntryiOSEffect), nameof(EntryEffect))]
namespace XamarinStudy.iOS.Effects
{
public class EntryiOSEffect : PlatformEffect
{
protected override void OnAttached()
{
if(this.Control!=null)
{
var textField = (UITextField)this.Control;
textField.BorderStyle = UITextBorderStyle.None;
}
}
protected override void OnDetached()
{
throw new NotImplementedException();
}
}
}
Setting up the User Interface

Go to MainPage.Xaml and write the following code.

MainPage.xaml

<?xml version="1.0" encoding="utf-8" ?>
<ContentPage xmlns="http://xamarin.com/schemas/2014/forms"
xmlns:x="http://schemas.microsoft.com/winfx/2009/xaml"
xmlns:d="http://xamarin.com/schemas/2014/forms/design"
xmlns:mc="http://schemas.openxmlformats.org/markup-compatibility/2006"
mc:Ignorable="d"
x:Class="XamarinStudy.MainPage" Title="Effects">
<StackLayout Margin="10,30,10,0" Spacing="20">
<Image Source="banner.png"/>
<Label Text="Effects" HorizontalOptions="CenterAndExpand" FontSize="Large"/>
<Entry HeightRequest="50" Placeholder="Normal Entry"/>
</StackLayout>
</ContentPage>
view raw MainPage.xaml hosted with ❤ by GitHub
Consuming the Effect

Here, consuming the Effect in your XAML

Add Namespace

xmlns:Effects="clr-namespace:XamarinStudy.Common.Controls"
view raw MainPage.xaml hosted with ❤ by GitHub
Add Effect in Entry

<Entry HeightRequest="50" BackgroundColor="LightGray" PlaceholderColor="Black" Placeholder="Effect Used Entry">
<Entry.Effects>
<Effects:EntryEffect/>
</Entry.Effects>
</Entry>
view raw MainPage.xaml hosted with ❤ by GitHub
Finally, check your XAML.

MainPage.XAML

<?xml version="1.0" encoding="utf-8" ?>
<ContentPage xmlns="http://xamarin.com/schemas/2014/forms"
xmlns:x="http://schemas.microsoft.com/winfx/2009/xaml"
xmlns:d="http://xamarin.com/schemas/2014/forms/design"
xmlns:mc="http://schemas.openxmlformats.org/markup-compatibility/2006"
mc:Ignorable="d"
xmlns:Effects="clr-namespace:XamarinStudy.Common.Controls"
x:Class="XamarinStudy.MainPage" Title="Effects">
<StackLayout Margin="10,30,10,0" Spacing="20">
<Image Source="banner.png"/>
<Label Text="Effects" HorizontalOptions="CenterAndExpand" FontSize="Large"/>
<Entry HeightRequest="50" Placeholder="Normal Entry"/>
<Entry HeightRequest="50" BackgroundColor="LightGray" PlaceholderColor="Black" Placeholder="Effect Used Entry">
<Entry.Effects>
<Effects:EntryEffect/>
</Entry.Effects>
</Entry>
</StackLayout>
</ContentPage>
view raw MainPage.xaml hosted with ❤ by GitHub
Click the "Play" button to try it out.
I hope you have understood how to use Effect instead of Custom renderer in Xamarin.Forms.

Thanks for reading. Please share your comments and feedback. Happy Coding 😍
Delpin Susai Raj Tuesday, 3 December 2019

Xamarin.Forms - Converter in MVVM using IValueConverter

In this blog post, you will learn how to use Converter in MVVM using IValueConverter in Xamarin.Forms.


Introduction

Xamarin.Forms - Working With Triggers
Xamarin.Forms code runs on multiple platforms - each of which has its own filesystem. This means that reading and writing files is most easily done using the native file APIs on each platform. Alternatively, embedded resources are a simpler solution to distribute data files with an app.

Value Converter

Use Converter instead of Trigger. Data bindings usually transfer data from a source property to a target property, and in some cases from the target property to the source property. This transfer is straightforward when the source and target properties are of the same type, or when one type can be converted to the other type through an implicit conversion. When that is not the case, a type of conversion must take place.

Prerequisites
  • Visual Studio 2017 or later (Windows or Mac)
Setting up a Xamarin.Forms Project

Start by creating a new Xamarin.Forms project. You wíll learn more by going through the steps yourself.

Create a new or existing Xamarin forms(.Net standard) Project. With Android and iOS Platform.
Create IntToBoolConverer 

Now, Create an IntToBoolConverer class Derived from IValueConveter

I implemented IntToBoolConverter If value !=0 I return true or else false. Whatever logic you need you can implement here.

IntToBoolConverter.cs

public class IntToBoolConverter : IValueConverter
{
public object Convert(object value, Type targetType, object parameter, CultureInfo culture)
{
return (int)value != 0;
}
public object ConvertBack(object value, Type targetType, object parameter, CultureInfo culture)
{
return (bool)value ? 1 : 0;
}
}
Setting up the User Interface

Here, Use IntToBoolConverter in your XAML.

Add Namespace

xmlns:converters="clr-namespace:XamarinStudy.Common.Converters"
view raw MainPage.xaml hosted with ❤ by GitHub
Add Static Resource

<ContentPage.Resources>
<ResourceDictionary>
<converters:IntToBoolConverter x:Key="IntToBoolConverter"/>
</ResourceDictionary>
</ContentPage.Resources>
view raw MainPage.xaml hosted with ❤ by GitHub
MainPage.Xaml 

<?xml version="1.0" encoding="utf-8" ?>
<ContentPage xmlns="http://xamarin.com/schemas/2014/forms"
xmlns:x="http://schemas.microsoft.com/winfx/2009/xaml"
xmlns:d="http://xamarin.com/schemas/2014/forms/design"
xmlns:mc="http://schemas.openxmlformats.org/markup-compatibility/2006"
mc:Ignorable="d"
xmlns:converters="clr-namespace:XamarinStudy.Common.Converters"
x:Class="XamarinStudy.MainPage" Title="Triggers">
</ContentPage.Behaviors>
<ContentPage.Resources>
<ResourceDictionary>
<converters:IntToBoolConverter x:Key="IntToBoolConverter"/>
</ResourceDictionary>
</ContentPage.Resources>
<StackLayout Margin="0,30,0,0">
<Image Source="banner.png"/>
<StackLayout x:Name="PersonList" BindableLayout.ItemsSource="{Binding Persons}" HorizontalOptions="FillAndExpand">
<BindableLayout.ItemTemplate>
<DataTemplate>
<StackLayout >
<Label Margin="20,0" Text="{Binding Name}"/>
<Label Margin="20,0" Text="{Binding Age}"/>
<Button Text="Click Me!" IsEnabled="{Binding Count, Converter={StaticResource IntToBoolConverter}}"/>
<BoxView HeightRequest="1" BackgroundColor="Black"/>
<StackLayout.GestureRecognizers>
<TapGestureRecognizer Command="{Binding BindingContext.SelectPersonCommand,Source={x:Reference PersonList}}" CommandParameter="{Binding PersonId}"/>
</StackLayout.GestureRecognizers>
</StackLayout>
</DataTemplate>
</BindableLayout.ItemTemplate>
</StackLayout>
</StackLayout>
</ContentPage>
view raw MainPage.xaml hosted with ❤ by GitHub
Click the "Play" button to try it out.

ValueToColorConveter

In this converter, I used to change color by given values.  If value = 0 Red color else Green color.

ValueToColorConveter.cs

public class ValueToColorConverter : IValueConverter
{
public object Convert(object value, Type targetType, object parameter, CultureInfo culture)
{
return (int)value == 0 ? Color.Red : Color.Green;
}
public object ConvertBack(object value, Type targetType, object parameter, CultureInfo culture)
{
return value;
}
}

Whatever you need to write conditions in XAML use Converter. My suggestion use converter instead of Triggers.

I hope you have understood how to use Converter in MVVM using IValueConverter in Xamarin.Forms.

Thanks for reading. Please share your comments and feedback. Happy Coding :)
Delpin Susai Raj Thursday, 28 November 2019

Xamarin.Forms - EventToCommand Behavior in MVVM ViewModel

In this blog post, you will learn how to use Appearing and Disappearing in MVVM ViewModel using EventToCommand Behaviour in Xamarin.Forms.

Introduction

Xamarin.Forms code runs on multiple platforms - each of which has its own filesystem. This means that reading and writing files is most easily done using the native file APIs on each platform. Alternatively, embedded resources are a simpler solution to distribute data files with an app.

EventToCommand Behaviour

EventToCommandBehavior class is a reusable Xamarin.Forms custom behavior that executes a command in response to any event firing.

Following behavior properties must be set to use the EventToCommand behavior:
  1. EventName – the name of the event the behavior listens to(Ex: Apperaing).
  2. Command – the ICommand to be executed. The behavior expects to find the ICommand instance on the BindingContext of the attached control, which may be inherited from a parent element.
Prerequisites
  • Visual Studio 2017 or later (Windows or Mac)
Setting up a Xamarin.Forms Project

Start by creating a new Xamarin.Forms project. You wíll learn more by going through the steps yourself.

Create a new or existing Xamarin forms(.Net standard) Project. With Android and iOS Platform.
Create BehaviourBase Class 

Now, Create a Behaviour Base class Derived from Behavior and BindableObject

BehavourBase.cs

public class BehaviorBase<T>: Behavior<T> where T : BindableObject
{
public T AssociatedObject { get; private set; }
protected override void OnAttachedTo(T bindable)
{
base.OnAttachedTo(bindable);
AssociatedObject = bindable;
if (bindable.BindingContext != null)
BindingContext = bindable.BindingContext;
bindable.BindingContextChanged += OnBindingContextChanged;
}
protected override void OnDetachingFrom(T bindable)
{
base.OnDetachingFrom(bindable);
bindable.BindingContextChanged -= OnBindingContextChanged;
AssociatedObject = null;
}
void OnBindingContextChanged(object sender, EventArgs e)
{
OnBindingContextChanged();
}
protected override void OnBindingContextChanged()
{
base.OnBindingContextChanged();
BindingContext = AssociatedObject.BindingContext;
}
}
view raw BehavourBase.cs hosted with ❤ by GitHub
Create EventToCommand Behaviour

Here, Create a EventToCommand Behaviour Class to convert your events to Commad and also implement bindable properties.
  1. EventName
  2. Command
EventToCommandBehaviour.cs

public class EventToCommandBehavior: BehaviorBase<VisualElement>
{
Delegate eventHandler;
public static readonly BindableProperty EventNameProperty = BindableProperty.Create("EventName", typeof(string), typeof(EventToCommandBehavior), null, propertyChanged: OnEventNameChanged);
public static readonly BindableProperty CommandProperty = BindableProperty.Create("Command", typeof(ICommand), typeof(EventToCommandBehavior), null);
public string EventName
{
get { return (string)GetValue(EventNameProperty); }
set { SetValue(EventNameProperty, value); }
}
public ICommand Command
{
get { return (ICommand)GetValue(CommandProperty); }
set { SetValue(CommandProperty, value); }
}
protected override void OnAttachedTo(VisualElement bindable)
{
base.OnAttachedTo(bindable);
RegisterEvent(EventName);
}
protected override void OnDetachingFrom(VisualElement bindable)
{
DeregisterEvent(EventName);
base.OnDetachingFrom(bindable);
}
static void OnEventNameChanged(BindableObject bindable, object oldValue, object newValue)
{
var behavior = (EventToCommandBehavior)bindable;
if (behavior.AssociatedObject == null) return;
string oldEventName = (string)oldValue;
string newEventName = (string)newValue;
behavior.DeregisterEvent(oldEventName);
behavior.RegisterEvent(newEventName);
}
void RegisterEvent(string name)
{
if (string.IsNullOrWhiteSpace(name)) return;
EventInfo eventInfo = AssociatedObject.GetType().GetRuntimeEvent(name);
if (eventInfo == null)
throw new ArgumentException(string.Format("EventToCommandBehavior: Can't register the '{0}' event.", EventName));
MethodInfo methodInfo = typeof(EventToCommandBehavior).GetTypeInfo().GetDeclaredMethod("OnEvent");
eventHandler = methodInfo.CreateDelegate(eventInfo.EventHandlerType, this);
eventInfo.AddEventHandler(AssociatedObject, eventHandler);
}
void DeregisterEvent(string name)
{
if (string.IsNullOrWhiteSpace(name) || eventHandler == null)
return;
EventInfo eventInfo = AssociatedObject.GetType().GetRuntimeEvent(name);
if (eventInfo == null)
throw new ArgumentException(string.Format("EventToCommandBehavior: Can't de-register the '{0}' event.", EventName));
eventInfo.RemoveEventHandler(AssociatedObject, eventHandler);
eventHandler = null;
}
void OnEvent(object sender, object eventArgs)
{
if (Command == null) return;
object resolvedParameter;
resolvedParameter = eventArgs;
if (Command.CanExecute(resolvedParameter))
Command.Execute(resolvedParameter);
}
}
BaseViewModel

In this step, I Create a common BaseViewModel for reusable purpose.

Note: I use RelayCommand Instead of Command. you can use Command.

Refresh

Refresh command indicate to Appearing Commad. Whatever you want to implement when page load time you can use RefrehCommad.

CleanUp

Cleanup command indicate to OnDisapearing. This CleanUpCommand when your page is dis appearing time it will be called.

BaseViewModel.cs

public class BaseViewModel : ViewModelBase
{
#region Fields
private RelayCommand _refreshCommand;
private RelayCommand _cleanupCommand;
#endregion
#region Properties
public RelayCommand RefreshCommand
{
get
{
return _refreshCommand ?? (_refreshCommand = new RelayCommand(this.Refresh));
}
}
public RelayCommand CleanupCommand
{
get
{
return _cleanupCommand ?? (_cleanupCommand = new RelayCommand(this.Cleanup));
}
}
#endregion
#region Methods
public virtual void Refresh()
{
}
public override void Cleanup()
{
base.Cleanup();
}
#endregion
}
MainPageViewModel

Now, Use Refresh and CleanUp command from BaseViewMmodel in your Pages.

MainPageViewModel.cs

public class MainPageViewModel:BaseViewModel
{
#region Fields
private ObservableCollection<Person> _persons;
#endregion
#region Constructor
public MainPageViewModel()
{
}
#endregion
#region Properties
public ObservableCollection<Person> Persons
{
get { return _persons; }
set { Set(() => Persons, ref _persons, value); }
}
#endregion
#region Methods
public override void Refresh()
{
base.Refresh();
this.Persons = new ObservableCollection<Person>();
this.Persons.Add(new Person { PersonId = 1, Name = "Smith", Age = 22 });
this.Persons.Add(new Person { PersonId = 2, Name = "Delpin", Age = 23 });
this.Persons.Add(new Person { PersonId = 1, Name = "Raj", Age = 20 });
this.Persons.Add(new Person { PersonId = 1, Name = "John", Age = 25 });
}
public override void Cleanup()
{
this.Persons = null;
base.Cleanup();
}
#endregion
}
Setting up the User Interface

Here, Implement EventToCommandBehaviour in your View.

Add Namespace

xmlns:behaviors="clr-namespace:XamarinStudy.Common.Behaviors"
view raw MainPage.xaml hosted with ❤ by GitHub
Add Behaviour

<ContentPage.Behaviors>
<behaviors:EventToCommandBehavior EventName="Appearing" Command="{Binding RefreshCommand}"/>
<behaviors:EventToCommandBehavior EventName="Disappearing" Command="{Binding CleanupCommand}"/>
</ContentPage.Behaviors>
view raw MainPage.xaml hosted with ❤ by GitHub
MainPage.Xaml 

<ContentPage xmlns="http://xamarin.com/schemas/2014/forms"
xmlns:x="http://schemas.microsoft.com/winfx/2009/xaml"
xmlns:d="http://xamarin.com/schemas/2014/forms/design"
xmlns:mc="http://schemas.openxmlformats.org/markup-compatibility/2006"
mc:Ignorable="d"
xmlns:behaviors="clr-namespace:XamarinStudy.Common.Behaviors"
x:Class="XamarinStudy.MainPage" Title="Bindable Layout">
<ContentPage.Behaviors>
<behaviors:EventToCommandBehavior EventName="Appearing" Command="{Binding RefreshCommand}"/>
<behaviors:EventToCommandBehavior EventName="Disappearing" Command="{Binding CleanupCommand}"/>
</ContentPage.Behaviors>
<StackLayout x:Name="PersonList" BindableLayout.ItemsSource="{Binding Persons}" HorizontalOptions="FillAndExpand">
<BindableLayout.ItemTemplate>
<DataTemplate>
<StackLayout Spacing="10" >
<Label Margin="20,0" Text="{Binding Name}"/>
<Label Margin="20,0" Text="{Binding Age}"/>
<BoxView HeightRequest="1" BackgroundColor="Black"/>
<StackLayout.GestureRecognizers>
<TapGestureRecognizer Command="{Binding BindingContext.SelectPersonCommand,Source={x:Reference PersonList}}" CommandParameter="{Binding PersonId}"/>
</StackLayout.GestureRecognizers>
</StackLayout>
</DataTemplate>
</BindableLayout.ItemTemplate>
</StackLayout>
</ContentPage>
view raw MainPage.xaml hosted with ❤ by GitHub
Click the "Play" button to try it out.

I hope you have understood how to use Appearing and Disappearing in MVVM ViewModel using EventToCommand Behaviour in Xamarin.Forms..

Thanks for reading. Please share your comments and feedback. Happy Coding :)
Delpin Susai Raj Sunday, 24 November 2019

Xamarin.Forms - Bindable Layout

In this blog post, you will learn how to use Bindable Layout in Xamarin.Forms.

Introduction
Xamarin.Forms code runs on multiple platforms - each of which has its own filesystem. This means that reading and writing files is most easily done using the native file APIs on each platform. Alternatively, embedded resources are a simpler solution to distribute data files with an app.

Bindable Layout

Bindable layouts enable any layout class that derives from the Layout<T> class to generate its content by binding to a collection of items, with the option to set the appearance of each item with a DataTemplate. Bindable Layout it's like a ListView.

Bindable Layout Attached properties.
  1. ItemsSource – Gets sets the collection of IEnumerable items to template and display.
  2. ItemDataTemplate – Gets sets DataTemplate to apply to each item in the collection of items displayed layout.
  3. ItemTemplateSelector – DataTemplateSelector that will be used to choose a DataTemplate for an item at runtime.
Prerequisites
  • Visual Studio 2017 or later (Windows or Mac)
Setting up a Xamarin.Forms Project

Start by creating a new Xamarin.Forms project. You wíll learn more by going through the steps yourself.

Create a new or existing Xamarin forms(.Net standard) Project. With Android and iOS Platform.
Bindable Layout

Lets start with how to use Bindable layout in your app instead of listview.

Use Bindable Layout

In this step, use bindable layout in Stacklayout.

MainPage.XAML

<StackLayout x:Name="PersonList" BindableLayout.ItemsSource="{Binding Persons}" HorizontalOptions="FillAndExpand">
<BindableLayout.ItemTemplate>
<DataTemplate>
<StackLayout Spacing="10" >
<Label Margin="20,0" Text="{Binding Name}"/>
<Label Margin="20,0" Text="{Binding Age}"/>
<BoxView HeightRequest="1" BackgroundColor="Black"/>
<StackLayout.GestureRecognizers>
<TapGestureRecognizer Command="{Binding BindingContext.SelectPersonCommand,Source={x:Reference PersonList}}" CommandParameter="{Binding PersonId}"/>
</StackLayout.GestureRecognizers>
</StackLayout>
</DataTemplate>
</BindableLayout.ItemTemplate>
</StackLayout>
view raw MainPage.XAML hosted with ❤ by GitHub
Create a Model

Now, Create a simple model to create a collection.

Person.cs

public class Person
{
public int PersonId { get; set; }
public string Name { get; set; }
public int Age { get; set; }
}
view raw Person.cs hosted with ❤ by GitHub
Create a ViewModel

In this step, create a viewmodel to bind the collection to bindable layout.

MainPageViewModel.cs

public class MainPageViewModel:BaseViewModel
{
#region Fields
private ObservableCollection<Person> _persons;
private Command<int> _selectPersonCommand;
#endregion
#region Constructor
public MainPageViewModel()
{
this.Persons = new ObservableCollection<Person>();
this.Persons.Add(new Person { PersonId = 1, Name = "Smith", Age = 22 });
this.Persons.Add(new Person { PersonId = 2, Name = "Delpin", Age = 23 });
this.Persons.Add(new Person { PersonId = 1, Name = "Raj", Age = 20 });
this.Persons.Add(new Person { PersonId = 1, Name = "John", Age = 25 });
}
#endregion
#region Properties
public ObservableCollection<Person> Persons
{
get { return _persons; }
set { Set(() => Persons, ref _persons, value); }
}
public Command<int> SelectPersonCommand
{
get
{
return _selectPersonCommand ?? (_selectPersonCommand = new Command<int>((id) =>
{
Application.Current.MainPage.DisplayAlert("Selected Peron", "Person id : " + id.ToString(), "Ok");
}));
}
}
#endregion
}
Selected Item

Use GestureRecognizers for select item from collection, because bindable layout have no ItemSelected event.

MainPage.Xaml


<StackLayout.GestureRecognizers>
<TapGestureRecognizer Command="{Binding BindingContext.SelectPersonCommand,Source={x:Reference PersonList}}" CommandParameter="{Binding PersonId}"/>
</StackLayout.GestureRecognizers>
view raw MainPage.xaml hosted with ❤ by GitHub
MainPageViewModel.cs

public Command<int> SelectPersonCommand
{
get
{
return _selectPersonCommand ?? (_selectPersonCommand = new Command<int>((id) =>
{
Application.Current.MainPage.DisplayAlert("Selected Peron", "Person id : " + id.ToString(), "Ok");
}));
}
}

Try it out.
I hope you have understood how to use Bindable Layout in Xamarin.Forms..

Thanks for reading. Please share your comments and feedback. Happy Coding :)
Delpin Susai Raj Friday, 18 October 2019

Xamarin.Forms - MVVM ViewModel Locator using MVVM Light

In this blog post, you will learn how to create a MVVM ViewModel Locator using MVVM Light in Xamarin.Forms.

Introduction

Xamarin.Forms code runs on multiple platforms - each of which has its own filesystem. This means that reading and writing files is most easily done using the native file APIs on each platform. Alternatively, embedded resources are a simpler solution to distribute data files with an app.

MVVM

MVVM - Model View ViewModel

MVVM Is the design pattern to separate the user interface & business logic concerns.I suppose that you heard something about it. This pattern created by Microsoft is widely used with applications created with .NET Framework but not only because you can also use it with Xamarin.

There are many different frameworks to help Xamarin developer
  • MVVM Cross 
  • MVVM Fresh 
  • Prism
  • MVVM Light
MVVM Light

MVVM Light lightweight framework which allows developers to choose which components they want to use. (like ViewModel Locator, Navigation Service, Dialogue Service)

Prerequisites
  • Visual Studio 2017 or later (Windows or Mac)
  • Mvvm Light Nuget Package
Setting up a Xamarin.Forms Project

Start by creating a new Xamarin.Forms project. You wíll learn more by going through the steps yourself.

Visual Studio 2019 has more options in the opening window. Clone or check out the code from any repository or, open a project or solution for your computer.

Now, you need to click "Create a new project".
Now, filter by Project Type: Mobile

Choose the Mobile App (Xamarin. forms) project under C# and Mobile.

Name your app. You probably want your project and solution to use the same name as your app. Put it on your preferred location for projects and click "Create".

Now, select the blank app and target platforms - Android, iOS and Windows (UWP).

Subsequently, go to the solution. In there, you get all the files and sources of your project (.NET Standard). Now, select the XAML page and double-click to open the MainPage.Xaml page.

You now have a basic Xamarin.Forms app. Click the Play button to try it out.

NuGet Packages

Now, add the following NuGet Packages.
  • MVVM Light
  • MVVM Light Libs 
Go to Solution Explorer and select your solution. Right-click and select "Manage NuGet Packages for Solution". Search "MVVM Light" and add Package. Remember to install it for each project (.NET Standard, Android, iO).

ViewModel Locator

Here, Going to register Viewmodels and Create instance using Mvvm Light.

ViewModelLocator.cs

using GalaSoft.MvvmLight.Ioc;
using GalaSoft.MvvmLight.Views;
using System;
using System.Collections.Generic;
using System.Text;
using XamarinStudy.ViewModels;
namespace XamarinStudy.Services
{
/// <summary>
/// Author : Delpin
/// </summary>
public class ViewModelLocator
{
public ViewModelLocator()
{
SimpleIoc.Default.Register<LandingPageViewModel>();
}
public LandingPageViewModel LandingPageVM
{
get
{
if (!SimpleIoc.Default.IsRegistered<LandingPageViewModel>())
{
SimpleIoc.Default.Register<LandingPageViewModel>();
}
return SimpleIoc.Default.GetInstance<LandingPageViewModel>();
}
}
}
}
App.xaml.cs

In this step, Create a Viewmodellocator instance when your app first time open.

public partial class App : Application
{
private static ViewModelLocator _viewModelLocator;
public App()
{
InitializeComponent();
MainPage = new LandingPage();
}
public static ViewModelLocator ViewModelLocator
{
get { return _viewModelLocator ?? (_viewModelLocator = new ViewModelLocator()); }
}
}
view raw App.xaml.cs hosted with ❤ by GitHub
BindingContext

Now, Set your ViewModel BindingContext to ContentPage.

using System;
using System.Collections.Generic;
using System.Linq;
using System.Text;
using System.Threading.Tasks;
using Xamarin.Forms;
using Xamarin.Forms.Xaml;
namespace XamarinStudy.ContentPages
{
[XamlCompilation(XamlCompilationOptions.Compile)]
public partial class LandingPage : ContentPage
{
public LandingPage()
{
InitializeComponent();
BindingContext = App.ViewModelLocator.LandingPageVM;
}
}
}
Done.

I hope you have understood how to create a MVVM ViewModel Locator using MVVM Light in Xamarin.Forms..

Thanks for reading. Please share your comments and feedback. Happy Coding :)
Delpin Susai Raj Tuesday, 24 September 2019

Xamarin.Forms - Working with CarouselView

In this blog post, you will learn how to use CarouselView in Xamarin.Forms.

Introduction

CollectionView

Xamarin.Forms code runs on multiple platforms - each of which has its own filesystem. This means that reading and writing files is most easily done using the native file APIs on each platform. Alternatively, embedded resources are a simpler solution to distribute data files with an app.

CarouselView

CarouselView is available in Xamarin.Forms 4.3. However, it is currently experimental and can only be used by adding the following line of code to your AppDelegate class on iOS, or to your MainActivity class on Android, before calling Forms.Init:

Forms.SetFlags("CollectionView_Experimental");
view raw gistfile1.txt hosted with ❤ by GitHub
https://docs.microsoft.com/en-us/xamarin/xamarin-forms/user-interface/carouselview/
https://github.com/pauldipietro/CarouselViewChallenge

Prerequisites
  • Visual Studio 2017 or later (Windows or Mac)
  • Xamarin.Forms 4.3 Updated
Setting up a Xamarin.Forms Project

Start by creating a new Xamarin.Forms project. You wíll learn more by going through the steps yourself.

Visual Studio 2019 has more options in the opening window. Clone or check out the code from any repository or, open a project or solution for your computer.

Now, you need to click "Create a new project".

Now, filter by Project Type: Mobile

Choose the Mobile App (Xamarin. forms) project under C# and Mobile.

Name your app. You probably want your project and solution to use the same name as your app. Put it on your preferred location for projects and click "Create".

Now, select the blank app and target platforms - Android, iOS and Windows (UWP).

Subsequently, go to the solution. In there, you get all the files and sources of your project (.NET Standard). Now, select the XAML page and double-click to open the MainPage.Xaml page.

You now have a basic Xamarin.Forms app. Click the Play button to try it out.

Note:

Before you initialize Xamarin.Forms in your MainActivity.cs and AppDelegate, add the following flag.

Android Implementation

MainActivity.cs
protected override void OnCreate(Bundle savedInstanceState)
{
TabLayoutResource = Resource.Layout.Tabbar;
ToolbarResource = Resource.Layout.Toolbar;
base.OnCreate(savedInstanceState);
Forms.SetFlags("CollectionView_Experimental");
Xamarin.Essentials.Platform.Init(this, savedInstanceState);
global::Xamarin.Forms.Forms.Init(this, savedInstanceState);
LoadApplication(new App());
}
view raw MainActivity.cs hosted with ❤ by GitHub
iOS Implementation

AppDelegate.cs

public override bool FinishedLaunching(UIApplication app, NSDictionary options)
{
Forms.SetFlags("CollectionView_Experimental");
global::Xamarin.Forms.Forms.Init();
LoadApplication(new App());
return base.FinishedLaunching(app, options);
}
view raw AppDelegate.cs hosted with ❤ by GitHub

Create a Model

Create a Model to Bind the Collections.

public class BirdsModel
{
public string Title { get; set; }
public ImageSource ImagePath { get; set; }
public string Description { get; set; }
}
view raw BirdsModel.cs hosted with ❤ by GitHub

ViewModel

Now, Bind the Collection to CarouselView. Similar CollectionView and ListView.

using CarouselViewChallenge.Models;
namespace CarouselViewChallenge.ViewModels
{
public class CarouselPageViewModel: INotifyPropertyChanged
{
public event PropertyChangedEventHandler PropertyChanged;
private ObservableCollection<BirdsModel> _birds;
private string _pageTitle;
public CarouselPageViewModel()
{
_pageTitle = "CarouselViewChallege";
_birds = new ObservableCollection<BirdsModel>();
_birds.Add(new BirdsModel { Title = "Asian Paradise Flycatcher", ImagePath = "Asian-Paradise-Flycatcher.jpg" });
_birds.Add(new BirdsModel { Title = "Sarus Crane", ImagePath = "Sarus-Crane.jpg" });
_birds.Add(new BirdsModel { Title = "Himalayan Monal", ImagePath = "Himalayan-Monal.jpg" });
_birds.Add(new BirdsModel { Title = "Indian Peafowl", ImagePath = "Indian-Peafowl.jpg" });
_birds.Add(new BirdsModel { Title = "Mrs. Gould’s Sunbird", ImagePath = "Mrs.-Gould’s-Sunbird.jpg" });
_birds.Add(new BirdsModel { Title = "Oriental Dwarf Kingfisher", ImagePath = "Oriental-Dwarf-Kingfisher.jpg" });
_birds.Add(new BirdsModel { Title = "Red Headed Trogon", ImagePath = "Red-Headed-Trogon.jpg" });
}
public ObservableCollection<BirdsModel> Birds
{
get
{
return _birds;
}
set
{
if (_birds != value)
{
_birds = value;
OnPropertyChanged(new PropertyChangedEventArgs("Birds"));
}
}
}
public string Title
{
get
{
return _pageTitle;
}
set
{
if (_pageTitle != value)
{
_pageTitle = value;
OnPropertyChanged(new PropertyChangedEventArgs("Title"));
}
}
}
private void OnPropertyChanged(PropertyChangedEventArgs eventArgs)
{
PropertyChanged?.Invoke(this, eventArgs);
}
}
}
Setting up the User Interface

Go to MainPage.Xaml and write the following code. I just created one CarouselView it's like a collectionview

https://www.c-sharpcorner.com/article/xamarin-forms-collectionview2/

MainPage.xaml

<?xml version="1.0" encoding="utf-8" ?>
<ContentPage xmlns="http://xamarin.com/schemas/2014/forms"
xmlns:x="http://schemas.microsoft.com/winfx/2009/xaml"
xmlns:d="http://xamarin.com/schemas/2014/forms/design"
xmlns:mc="http://schemas.openxmlformats.org/markup-compatibility/2006"
mc:Ignorable="d" Title="{Binding Title}"
x:Class="CarouselViewChallenge.Views.CarouselViewChallengePage">
<ContentPage.Content>
<StackLayout>
<CarouselView ItemsSource="{Binding Birds}" PeekAreaInsets="50">
<CarouselView.ItemTemplate>
<DataTemplate>
<StackLayout>
<Frame BorderColor="Gray" Margin="8" HasShadow="True" HeightRequest="250" CornerRadius="20" VerticalOptions="CenterAndExpand">
<StackLayout>
<Image Source="{Binding ImagePath}"/>
<Label Text="{Binding Title}" FontSize="24" FontAttributes="Bold" HorizontalTextAlignment="Center"/>
</StackLayout>
</Frame>
</StackLayout>
</DataTemplate>
</CarouselView.ItemTemplate>
</CarouselView>
</StackLayout>
</ContentPage.Content>
</ContentPage>
view raw MainPage.xaml hosted with ❤ by GitHub

Click the "Play" button to try it out.

I hope you have understood how to use CarouselView in Xamarin.Forms..

Thanks for reading. Please share your comments and feedback. Happy Coding :)
Delpin Susai Raj Tuesday, 13 August 2019

Xamarin.Forms - Implement CI/CD using App Center

In this blog post, you will learn how to implement Continuous Integration(CI) and Deployment (CD) using App Center in Xamarin.Forms mobile app.


Introduction

Xamarin.Forms code runs on multiple platforms - each of which has its own filesystem. This means that reading and writing files is most easily done using the native file APIs on each platform. Alternatively, embedded resources are a simpler solution to distribute data files with an app.

App Center 

App Center has multiple services that are most commonly used by mobile developers, where multiple services act as a single integrated product. With the use of a single integrated product, you can build, test, distribute, and monitor your mobile apps, and also implement push notifications.

Support Platforms

  • Android
  • iOS
  • React Native
  • UWP
  • Xamarin
  • macOS
  • Cordova

App Center Services

  1. Build
  2. Diagnostics (Formerly Crashes)
  3. Test
  4. Analytics
  5. Distribute
  6. Push Notifications


CI - Continuous integration is the process of merging all developers work into a single main repository.

CD - Continuous delivery is a process of automatically buid and deploying your Xamarin apps to testers, or end users.

More

https://docs.microsoft.com/en-us/appcenter/build/

Prerequisites

  • Visual Studio 2017 or later (Windows or Mac)
  • App Center Account
  • Any Git Repository

Create an app in the App Center (Android)

In this step, create an app in the App Center. Go to the following link. Now, sign in using your preferred account.

https://appcenter.ms/

Add New app

In this step, give your app name (Ex: MyApp). Select OS (Android) and Platform (Xamarin). Click Add new app.

Connect to Repository

In this step connecting your source repository. You can select which Repository you used. I'm going to select Azure Devops.

Now select your repository and working branch. Which branch you are going to build continuously. You should select. I used master branch.

Build Configuration

In this step I'm going to configure, build environment. After selecting git repository branches, You will see this window. Now you can click the setting icon in your branch.

Build

In this section you configure your app build details.

Configuration    = Release
SDK version    = select Stable sdk version
Build frequency = build this branch on every push (once you push code your remote repository it will automatically build)

Environment

In this section in your app have any environment variable you can configure here.

Sign builds

In this section, Configure signing details. Upload your Keystore file here. Check following link to get Keystore file.

https://docs.microsoft.com/en-us/xamarin/android/deploy-test/signing/keystore-signature?tabs=macos

Set keystore password here.

Distribute Builds 

In this step release your app to Store or Groups, I select groups (once my build success the apk will send selected group.

Now Save & Build.

Done. You can commit your code it will automatically build and distribute your respective group or store.

I hope you have understood how to implement Continuous Integration(CI) and Deployment (CD) using App Center in Xamarin.Forms mobile app.

Thanks for reading. Please share your comments and feedback. Happy Coding :)
Delpin Susai Raj Friday, 26 July 2019

Xamarin.Forms - Working with Firebase Analytics

In this blog post, you will learn how to implement Firebase Analytics in Xamarin.Forms mobile app.

Introduction

Xamarin.Forms code runs on multiple platforms - each of which has its own filesystem. This means that reading and writing files is most easily done using the native file APIs on each platform. Alternatively, embedded resources are a simpler solution to distribute data files with an app.

Firebase

Firebase gives you functionality like analytics, databases, messaging and crash reporting so you can move quickly and focus on your users.

Firebase is a back-end platform for building Web, Android, and iOS applications. It offers real-time database, different APIs, multiple authentication types and hosting platform. This is an introductory tutorial, which covers the basics of the Firebase platform and explains how to deal with its various components and sub-components.

Build apps with Firebase

  1. Real-time Database
  2. Storage
  3. Notifications
  4. Authentication
  5. Hosting

Firebase Analytics

Google Analytics for Firebase provides free, unlimited reporting on up to 500 distinct events. The SDK automatically captures certain key events and user properties, and you can define your own custom events to measure the things that uniquely matter to your business.
For more
https://firebase.google.com/docs/analytics

Prerequisites

  • Visual Studio 2017 or later (Windows or Mac)
  • Firebase Account

Setting up a Xamarin.Forms Project

https://github.com/susairajs/XamarinForms_FirebaseAnalytics

Start by creating a new Xamarin.Forms project. You wíll learn more by going through the steps yourself.

Visual Studio 2019 has more options in the opening window. Clone or check out the code from any repository or, open a project or solution for your computer.

Now, you need to click "Create a new project".

Now, filter by Project Type: Mobile

Choose the Mobile App (Xamarin. forms) project under C# and Mobile.

Name your app. You probably want your project and solution to use the same name as your app. Put it on your preferred location for projects and click "Create".

Now, select the blank app and target platforms - Android, iOS and Windows (UWP).

Subsequently, go to the solution. In there, you get all the files and sources of your project (.NET Standard). Now, select the XAML page and double-click to open the MainPage.Xaml page.

You now have a basic Xamarin.Forms app. Click the Play button to try it out.

Setting up the User Interface

Go to MainPage.Xaml and write the following code.

MainPage.xaml

<?xml version="1.0" encoding="UTF-8"?>
<ContentPage xmlns="http://xamarin.com/schemas/2014/forms" xmlns:x="http://schemas.microsoft.com/winfx/2009/xaml" x:Class="XMonkey.Views.FeedPage">
<ContentPage.Content>
<FlexLayout Direction="Column"
AlignItems="Center">
<Image Source="banner.png"/>
<Image Source="firebase.png" WidthRequest="200"/>
<Button Margin="0,50,0,0" Text="Click Me" Clicked="Handle_Clicked" />
</FlexLayout>
</ContentPage.Content>
</ContentPage>
view raw MainPage.xaml hosted with ❤ by GitHub

NuGet Package

Now, add the following NuGet package in your .Net Standard Project.

  • Xamarin.Firebase.Core

Create a Interface IFirebaseAnalytics 

Now, create an Interface in .Net Standard Project.

Write the following code.

IFirebaseAnalytics.cs

public interface IFirebaseAnalytics
{
void SendEvent(string eventId);
void SendEvent(string eventId, string paramName, string value);
void SendEvent(string eventId, IDictionary<string, string> parameters);
}

Android Implementation

Create a project in Firebase

In this step, create a project in Firebase. Go to the following link.

https://console.firebase.google.com/

Click "Add Project".

Now, give the project a name and select your country. Then, read the terms. Afterward, click "Create project".
Now, your project is ready, click "Continue".

Add Firebase to your Android App

Now Register your android app in firebase with Android package name, app name(optional) and your debuting signing certificate(optional) then click to register app.

Done, now you will get one google-service.json file you should download it.

Now Add google-service.json in your ProjectName.Android Project and set Bundle Action GoogleServicesJson

Add following ItemGroup in your ProjectName.Android.csproj file

<ItemGroup>
<GoogleServicesJson Include="google-services.json" />
</ItemGroup>
NuGet Package

Now, add the following NuGet package in your android project.

  • Xamarin.FireBase.Analytics.Impl

Create class FirebaseAnalytics in android project

FirebaseAnalytics.cs

[assembly: Xamarin.Forms.Dependency(typeof(FirebaseAnalytics))]
namespace XMonkey.Droid
{
public class FirebaseAnalytics:IFirebaseAnalytics
{
public void SendEvent(string eventId)
{
SendEvent(eventId, null);
}
public void SendEvent(string eventId, string paramName, string value)
{
SendEvent(eventId, new Dictionary<string, string>
{
{paramName, value}
}); ;
}
public void SendEvent(string eventId, IDictionary<string, string> parameters)
{
var firebaseAnalytics = FirebaseAnalytics.GetInstance(Forms.Context);
if (parameters == null)
{
firebaseAnalytics.LogEvent(eventId, null);
return;
}
var bundle = new Bundle();
foreach (var param in parameters)
{
bundle.PutString(param.Key, param.Value);
}
firebaseAnalytics.LogEvent(eventId, bundle);
}
}
}
iOS Implementation

Add Firebase to your iOS App

Now Register your iOS app in firebase with iOS Bundle id, app nickname(optional) and App Store id(optional) then click to register app.

Done, now you will get one GoogleService-Info.plist file you should download it.

Now Add GoogleService-Info.plist in your ProjectName.iOS Project and set Bundle Action Bundle Resource

NuGet Package

Now, add the following NuGet package in your iOS project.

  • Xamarin.FireBase.iOS.Analytics

Create class FirebaseAnalytics in iOS project

FirebaseAnalytics.cs


[assembly: Dependency(typeof(FirebaseAnalytics))]
namespace XMonkey.iOS
{
public class FirebaseAnalytics: IFirebaseAnalytics
{
public void SendEvent(string eventId)
{
SendEvent(eventId, (IDictionary<string, string>)null);
}
public void SendEvent(string eventId, string paramName, string value)
{
SendEvent(eventId, new Dictionary<string, string>
{
{ paramName, value }
});
}
public void SendEvent(string eventId, IDictionary<string, string> parameters)
{
if (parameters == null)
{
Analytics.LogEvent(eventId, (Dictionary<object, object>)null);
return;
}
var keys = new List<NSString>();
var values = new List<NSString>();
foreach (var item in parameters)
{
keys.Add(new NSString(item.Key));
values.Add(new NSString(item.Value));
}
var parametersDictionary =
NSDictionary<NSString, NSObject>.FromObjectsAndKeys(values.ToArray(), keys.ToArray(), keys.Count);
Analytics.LogEvent(eventId, parametersDictionary);
}
}
}

Note:  Go to Run -> Run With -> Custom Configuration and add the following to Extra mlaunch Arguments:

--argument=-FIRAnalyticsDebugEnaled
view raw Run.cs hosted with ❤ by GitHub
Finally Add the Click Event in MainPage.xaml.cs

public partial class FeedPage : ContentPage
{
IFirebaseAnalytics eventTracker;
public FeedPage()
{
InitializeComponent();
eventTracker = DependencyService.Get<IFirebaseAnalytics>();
}
void Handle_Clicked(object sender, System.EventArgs e)
{
eventTracker.SendEvent("Click1");
}
}


Click the "Play" button to try it out.

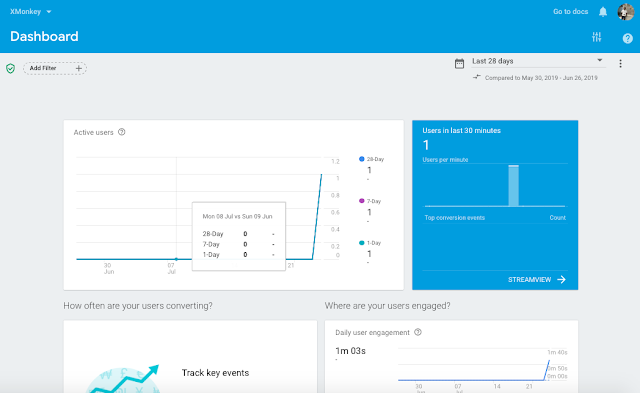
Check your app analytics in firebase


Download Full Project From GitHub

https://github.com/susairajs/XamarinForms_FirebaseAnalytics

I hope you have understood how to implement Firebase Analytics in Xamarin.Forms mobile app.

Thanks for reading. Please share your comments and feedback. Happy Coding :)
Delpin Susai Raj Tuesday, 23 July 2019

Xamarin.Forms - Bottom Tabbed Page using Shell

In this blog post, you will learn how to create a Tabbedpage and sub tabs using shell in Xamarin.Forms.


Introduction

Xamarin.Forms code runs on multiple platforms - each of which has its own filesystem. This means that reading and writing files is most easily done using the native file APIs on each platform. Alternatively, embedded resources are a simpler solution to distribute data files with an app.

Shell

Xamarin.Forms Shell reduces the complexity of mobile application development by providing the fundamental features that most mobile applications require. This includes a common navigation user experience, a URI-based navigation scheme, and an integrated search handler.

Prerequisites

  • Visual Studio 2019 (Windows or Mac)
  • Xamarin.Forms 4.0 Updated

Setting up a Xamarin.Forms Project

Start by creating a new Xamarin.Forms project. You wíll learn more by going through the steps yourself.

Visual Studio 2019 has more options in the opening window. Clone or check out the code from any repository or, open a project or solution for your computer.

Now, you need to click "Create a new project".

Now, filter by Project Type: Mobile

Choose the Mobile App (Xamarin. forms) project under C# and Mobile.

Name your app. You probably want your project and solution to use the same name as your app. Put it on your preferred location for projects and click "Create".

Now, select the blank app and target platforms - Android, iOS and Windows (UWP).

Subsequently, go to the solution. In there, you get all the files and sources of your project (.NET Standard). Now, select the XAML page and double-click to open the MainPage.Xaml page.

You now have a basic Xamarin.Forms app. Click the Play button to try it out.

Note : Your Xamarin.forms version should be updated 4.0

Bottom Tabbed Page

This code example is Bottom Tabbed Page

Method #1

AppShell.Xaml


<TabBar>
<Tab Title="Feed"
Icon="tab_feed.png">
<ShellContent Icon="tab_feed.png">
<views:FeedPage/>
</ShellContent>
</Tab>
<Tab Title="About"
Icon="tab_about.png">
<ShellContent>
<views:AboutPage />
</ShellContent>
</Tab>
</TabBar>
view raw AppShell.Xaml hosted with ❤ by GitHub

Method #2

AppShell.Xaml

<TabBar>
<Tab Title="Feed Page" Icon="tab_feed.png">
<ShellContent ContentTemplate="{DataTemplate views:FeedPage}">
</ShellContent>
</Tab>
<Tab Title="About Page" Icon="tab_about.png" >
<ShellContent ContentTemplate="{DataTemplate views:AboutPage}">
</ShellContent>
</Tab>
</TabBar>
view raw AppShell.xaml hosted with ❤ by GitHub

Method #3

AppShell.xaml

<TabBar>
<views:FeedPage Icon="tab_feed.png" Title="Feed Page"/>
<views:AboutPage Icon="tab_about.png" Title="About Page"/>
</TabBar>
view raw AppShell.xaml hosted with ❤ by GitHub

Try it out.

Sub Tab view

AppShell.xaml

This code example is Sub Tabbed Page

<TabBar>
<Tab Title="Feed Page" Icon="tab_feed.png">
<ShellContent Title="Feed" ContentTemplate="{DataTemplate views:FeedPage}">
</ShellContent>
<ShellContent Title="News" ContentTemplate="{DataTemplate views:NewsPage}">
</ShellContent>
</Tab>
<Tab Title="About Page" Icon="tab_about.png" >
<ShellContent ContentTemplate="{DataTemplate views:AboutPage}">
</ShellContent>
</Tab>
</TabBar>
view raw AppShell.xaml hosted with ❤ by GitHub

Click the "Play" button to try it out.

I hope you have understood how to create a Tabbedpage and sub tabs using shell in Xamarin.Forms..

Thanks for reading. Please share your comments and feedback. Happy Coding :)
Delpin Susai Raj Wednesday, 12 June 2019

Xamarin.Forms - Change Entry Return Button

In this blog post, you will learn how to change entry return button in Xamarin.Forms.


Introduction

Xamarin.Forms code runs on multiple platforms - each of which has its own filesystem. This means that reading and writing files is most easily done using the native file APIs on each platform. Alternatively, embedded resources are a simpler solution to distribute data files with an app.

Custom Renderers

Xamarin.Forms user interfaces are rendered using the native controls of the target platform, allowing Xamarin.Forms applications to retain the appropriate look and feel for each platform. Custom Renderers let developers override this process to customize the appearance and behaviour of Xamarin.Forms controls on each platform.

Prerequisites
  • Visual Studio 2017 or later (Windows or Mac)
Setting up a Xamarin.Forms Project

Start by creating a new Xamarin.Forms project. You wíll learn more by going through the steps yourself.

Visual Studio 2019 has more options in the opening window. Clone or check out the code from any repository or, open a project or solution for your computer.

Now, you need to click "Create a new project".
Now, filter by Project Type: Mobile

Choose the Mobile App (Xamarin. forms) project under C# and Mobile.

Name your app. You probably want your project and solution to use the same name as your app. Put it on your preferred location for projects and click "Create".

Now, select the blank app and target platforms - Android, iOS and Windows (UWP).

Subsequently, go to the solution. In there, you get all the files and sources of your project (.NET Standard). Now, select the XAML page and double-click to open the MainPage.Xaml page.

You now have a basic Xamarin.Forms app. Click the Play button to try it out.

Create a Custom Entry

Now, create an Inherit class form Entry for Customising the Entry control.

Now, write the following code.

CustomEntry.cs

using System;
using Xamarin.Forms;
namespace XamarinCustomEntry.Controls
{
public class CustomEntry:Entry
{
public new event EventHandler Completed;
public static readonly BindableProperty ReturnTypeProperty = BindableProperty.Create(
nameof(ReturnType),
typeof(ReturnType),
typeof(CustomEntry),
ReturnType.Done,
BindingMode.OneWay
);
public ReturnType ReturnType
{
get { return (ReturnType)GetValue(ReturnTypeProperty); }
set { SetValue(ReturnTypeProperty, value); }
}
public void InvokeCompleted()
{
if (this.Completed != null)
this.Completed.Invoke(this, null);
}
}
public enum ReturnType
{
Go,
Next,
Done,
Send,
Search
}
}
view raw CustomEntry.cs hosted with ❤ by GitHub
Android Implementation

In this step, create an inherit Class form, EntryRenderer for customizing the Entry control.

Now, write the code given below.

CustomEntryRenderer.cs

using System;
using System.Runtime.Remoting.Contexts;
using Xamarin.Forms;
using Xamarin.Forms.Platform.Android;
using XamarinCustomEntry.Controls;
using XamarinCustomEntry.Droid;
using Android.Content;
using Android.Widget;
using Android.Views.InputMethods;
[assembly: ExportRenderer(typeof(CustomEntry), typeof(CustomEntryRenderer))]
namespace XamarinCustomEntry.Droid
{
public class CustomEntryRenderer : EntryRenderer
{
public CustomEntryRenderer(Android.Content.Context context) : base(context)
{
AutoPackage = false;
}
protected override void OnElementChanged(ElementChangedEventArgs<Entry> e)
{
base.OnElementChanged(e);
CustomEntry entry = (CustomEntry)this.Element;
if (this.Control != null)
{
if (entry != null)
{
SetReturnType(entry);
// Editor Action is called when the return button is pressed
Control.EditorAction += (object sender, TextView.EditorActionEventArgs args) =>
{
if (entry.ReturnType != Controls.ReturnType.Next)
entry.Unfocus();
// Call all the methods attached to base_entry event handler Completed
entry.InvokeCompleted();
};
}
}
}
private void SetReturnType(CustomEntry entry)
{
Controls.ReturnType type = entry.ReturnType;
switch (type)
{
case Controls.ReturnType.Go:
Control.ImeOptions = ImeAction.Go;
Control.SetImeActionLabel("Go", ImeAction.Go);
break;
case Controls.ReturnType.Next:
Control.ImeOptions = ImeAction.Next;
Control.SetImeActionLabel("Next", ImeAction.Next);
break;
case Controls.ReturnType.Send:
Control.ImeOptions = ImeAction.Send;
Control.SetImeActionLabel("Send", ImeAction.Send);
break;
case Controls.ReturnType.Search:
Control.ImeOptions = ImeAction.Search;
Control.SetImeActionLabel("Search", ImeAction.Search);
break;
default:
Control.ImeOptions = ImeAction.Done;
Control.SetImeActionLabel("Done", ImeAction.Done);
break;
}
}
}
}
iOS Implementation

In this step, create an inherit Class form, EntryRenderer for customizing the Entry control.

Now, write the code given below.

CustomEntryRenderer.cs

using System;
using System.ComponentModel;
using UIKit;
using Xamarin.Forms;
using Xamarin.Forms.Platform.iOS;
using XamarinCustomEntry.Controls;
using XamarinCustomEntry.iOS;
[assembly: ExportRenderer(typeof(CustomEntry), typeof(CustomEntryRenderer))]
namespace XamarinCustomEntry.iOS
{
public class CustomEntryRenderer: EntryRenderer
{
protected override void OnElementChanged(ElementChangedEventArgs<Entry> e)
{
base.OnElementChanged(e);
CustomEntry entry = (CustomEntry)this.Element;
if (this.Control != null)
{
if (entry != null)
{
SetReturnType(entry);
Control.ShouldReturn += (UITextField tf) =>
{
entry.InvokeCompleted();
return true;
};
}
}
}
private void SetReturnType(CustomEntry entry)
{
Controls.ReturnType type = entry.ReturnType;
switch (type)
{
case Controls.ReturnType.Go:
Control.ReturnKeyType = UIReturnKeyType.Go;
break;
case Controls.ReturnType.Next:
Control.ReturnKeyType = UIReturnKeyType.Next;
break;
case Controls.ReturnType.Send:
Control.ReturnKeyType = UIReturnKeyType.Send;
break;
case Controls.ReturnType.Search:
Control.ReturnKeyType = UIReturnKeyType.Search;
break;
case Controls.ReturnType.Done:
Control.ReturnKeyType = UIReturnKeyType.Done;
break;
default:
Control.ReturnKeyType = UIReturnKeyType.Default;
break;
}
}
}
}
Setting up the User Interface

Go to MainPage.Xaml and write the following code.

MainPage.xaml

<?xml version="1.0" encoding="utf-8"?>
<ContentPage xmlns="http://xamarin.com/schemas/2014/forms"
xmlns:x="http://schemas.microsoft.com/winfx/2009/xaml"
xmlns:local="clr-namespace:XamarinCustomEntry"
x:Class="XamarinCustomEntry.MainPage"
xmlns:controls="clr-namespace:XamarinCustomEntry.Controls">
<StackLayout>
<Image Margin="0,100,0,0" Source="banner1.png"></Image>
<controls:CustomEntry ReturnType="Search" Placeholder="Search"></controls:CustomEntry>
<controls:CustomEntry ReturnType="Done" Placeholder="Done"></controls:CustomEntry>
</StackLayout>
</ContentPage>
view raw MainPage.xaml hosted with ❤ by GitHub

Click the "Play" button to try it out.
I hope you have understood how to change entry return button in Xamarin.Forms..

Thanks for reading. Please share your comments and feedback. Happy Coding :)